It is very important to have 64bit unixODBC libraries path (/usr/lib64/libodbc.so) in LD_LIBRARY_PATH because we run RHEL x64 and Oracle 64-bit software.
Step 6 –
Create init<sid>.ora. In my case, I will call this dg4odbc (initdg4odbc.ora). The content should be like below.
HS_DB_NAME = H1X
HS_FDS_CONNECT_INFO = H1X <===== This is the DSN name that comes from step 2 /etc/odbc.ini
The Oracle session has requested and is waiting for multiple contiguous database blocks (up to DB_FILE_MULTIBLOCK_READ_COUNT) to be read into the SGA from the disk.
Full Table scans
Fast Full Index Scans
ACTIONS:
Optimize multi-block I/O by setting the parameter DB_FILE_MULTIBLOCK_READ_COUNT
Partition pruning to reduce the number of blocks visited
Consider the usage of multiple buffers pools and caches of frequently used indexes/tables in the KEEP pool
Optimize the SQL statement that initiated most of the waits. The goal is to minimize the number of physical and logical reads.
Should the statement access the data by a full table scan or index FFS? Would an index range or unique scan be more efficient?
Does the query use the right driving table?
Are the SQL predicates appropriate for hash or merge join?
If full scans are appropriate, can parallel query improve the response time?
The objective is to reduce the demands for both the logical and
physical I/Os, and this is best achieved through SQL and application tuning.
Make sure all statistics are representative of the actual data. Check the LAST_ANALYZED date.
REMARKS:
If an application that has been running fine for a while suddenly clocks a lot of time on the DB file scattered read event and there hasn’t been a code change, you might want to check to see if one or more indexes have been dropped or become unusable.
DB file scattered read Reference Note# 34558.1
Thank you for giving your valuable time to read the above information.
If you want to be updated with all our articles send us the Invitation or Follow us:
Index reads performance can be affected by slow I/O subsystem and/or poor database files layout, which results in a higher average
wait time
Actions:
Check indexes on the table to ensure that the right index is being used
Check the column order of the index with the WHERE clause of the Top SQL statements
Rebuild indexes with a high clustering factor
Use partitioning to reduce the number of blocks being visited
Make sure optimizer statistics are up to date
Relocate ‘hot’ datafiles
Consider the usage of multiple buffers pools and cache frequently used indexes/tables in the KEEP pool
Inspect the execution plans of the SQL statements that access data
through indexes
Is it appropriate for the SQL statements to access data through
index lookups?
Is the application an online transaction processing (OLTP) or decision support system (DSS)?
Would full table scans be more efficient?
Do the statements use the right driving table?
The optimization goal is to minimize both the number of logical and physical I/Os.
Remarks:
The Oracle process wants a block that is currently not in the SGA, and it is waiting for the database block to be read into the SGA from the disk.
Significant DB file sequential read wait time is most likely an application issue.
If the DBA_INDEXES.CLUSTERING_FACTOR of the index approaches the number of blocks in the table, then most of the rows in the table are ordered. This is desirable.
However, if the clustering factor approaches the number of rows in the table, it means the rows in the table are randomly ordered and thus it requires more I/Os to complete the operation. You can improve the index’s clustering factor by rebuilding the table so that rows are ordered according to the index key and rebuilding the index thereafter.
The OPTIMIZER_INDEX_COST_ADJ and OPTIMIZER_INDEX_CACHING initialization parameters can influence the optimizer to favor the operation of the nested loop and choose an index access path over a full table scan.
Tuning I/O-related waits for Note id 223117.1
DB file sequential read Reference Note# 34559.1
Thank you for giving your valuable time to read the above information.
If you want to be updated with all our articles send us the Invitation or Follow us:
The following columns are returned in the below query:
Owner schema.
Object name and type (TABLE, INDEX, etc.).
Name of the table this object is associated with. For E.g. indexes are associated with their parent tables.
Database space is occupied by the object in megabytes.
Tablespace where an object is stored.
The number of extents allocated for the object.
Size of the initial extent in bytes.
Total database size occupied by the parent table. E.g. for indexes, it will be the size of the parent * table plus the sizes of all the indexes on that table.
SELECT * FROM (
SELECT
owner, object_name, object_type, table_name, ROUND(bytes)/1024/1024 AS MB,
tablespace_name, extents, initial_extent,
ROUND(Sum(bytes/1024/1024) OVER (PARTITION BY table_name)) AS total_table_MB
FROM (
SELECT owner, segment_name AS object_name, 'TABLE' AS object_type,
segment_name AS table_name, bytes,
tablespace_name, extents, initial_extent
FROM dba_segments
WHERE segment_type IN ('TABLE', 'TABLE PARTITION', 'TABLE SUBPARTITION')
UNION ALL
SELECT i.owner, i.index_name AS object_name, 'INDEX' AS object_type,
i.table_name, s.bytes,
s.tablespace_name, s.extents, s.initial_extent
FROM dba_indexes i, dba_segments s
WHERE s.segment_name = i.index_name
AND s.owner = i.owner
AND s.segment_type IN ('INDEX', 'INDEX PARTITION', 'INDEX SUBPARTITION')
UNION ALL
SELECT l.owner, l.column_name AS object_name, 'LOB_COLUMN' AS object_type,
l.table_name, s.bytes,
s.tablespace_name, s.extents, s.initial_extent
FROM dba_lobs l, dba_segments s
WHERE s.segment_name = l.segment_name
AND s.owner = l.owner
AND s.segment_type = 'LOBSEGMENT'
UNION ALL
SELECT l.owner, l.column_name AS object_name, 'LOB_INDEX' AS object_type,
l.table_name, s.bytes,
s.tablespace_name, s.extents, s.initial_extent
FROM dba_lobs l, dba_segments s
WHERE s.segment_name = l.index_name
AND s.owner = l.owner
AND s.segment_type = 'LOBINDEX'
)
WHERE owner in UPPER('&TABLE_NAME')
)
WHERE total_table_MB > 10
ORDER BY total_table_MB DESC, MB DESC
/
Thank you for giving your valuable time to read the above information.
If you want to be updated with all our articles send us the Invitation or Follow us:
A serial console connection to bare metal or virtual machine DB system allows you to manage and troubleshoot your system in single-user mode using an SSH connection, e.g. if the boot volume becomes full causing a standard SSH connection to fail with permission denied errors.
In this blog post, we will demonstrate step-by-step guidance to create the connection and connect to the DB system.
The Environment
Virtual Machine DB System in OCI
SSH client (Git Bash) on my local Windows notebook.
Create Console Connection
Step 1: Create Console Connection
From your DB System details page, under “Resources” on the left side, click on “Console Connections”, then “Create Console Connection”.
Upload or paste your SSH key and click on “Create Console Connection”.
Establish the Connection
Step 2: Copy the SSH String
Once the Console Connection got created, click on the dotted menu on the very right side, then on “Copy SSH String”.
Step 3: Connect to the Console
Paste the SSH String from the previous step in a terminal window, e.g. Git Bash on your local computer.
From the DB System details page, under “Resources” on the left side, click on “Nodes”. Click on the dotted menu on the very right side, then on “Reboot”.
Confirm rebooting the node.
Switch back to your console connection and you will see restart messages start to appear in the window.
As soon as you see the boot menu appear, use the up/down arrow keys to stop the automatic boot process.
Step 5: Enter the Boot Menu
As indicated in the menu, press “e” to edit the boot entry.
Use the down arrow key to scroll down through the entries until you reach the line that starts with “linuxefi” for instances running Oracle Linux 7.x (or “kernel for Oracle Linux 6.x”).
Add the following at the end of that line.
init=/bin/bash
You are already in the edit mode, so just use the left/right arrow keys to place the cursor at the end of the line and start typing.
Step 6: Start the Instance
As indicated in the menu, press “Ctrl-x” to start.
Now your machine is in maintenance mode and you can start troubleshooting.
Step 7: Delete the Console Connection
Once you are done, delete the console connection. Click on the dotted menu on the very right side, then on “Delete.
Confirm with “OK”.
Conclusion
Serial Console Connections provide a simple way to connect to your DB System machines as user root for troubleshooting even though a standard SSH connection is not possible due to issues on that machine.
Please find out all of our articles send us the Invitation or Follow us:
Databases and even application servers in the Cloud are usually provisioned in a private subnet that is not accessible from the internet. End users will access applications via a load balancer. To log in to the private machines for management purposes, customers will have to set up their private connection to Oracle Cloud via VPN or FastConnect. However, when you start a PoC and that connection is not yet set up and you are ambitious to start trying things out, you’ll need a way to connect to those private instances, where application servers or databases. Another use case is when you are outside of your organization’s network and need access to private resources.
One way to do so is to provision a compute instance in a public subnet and use it as a jump server. However:
Creating an instance with a public IP might violate your organization’s security rules.
You have to create and maintain further resources: public subnet, Internet Gateway, Security List, etc.
You have to take care of securing the jump sever instance adding more administrative work.
OCI Bastion service eliminates the need for deploying public subnets or jump servers and provides an easy way to build SSH connections to private resources in OCI. The private resources could be Compute VM instances, databases using the virtual or bare metal DB systems, or Exadata Cloud Service virtual machines.
The Environment
Exadata Cloud Service virtual machine in OCI with a private IP (10.0.2.2). This could be any other private resource in OCI with a private IP.
SSH client (Git Bash) on my local Windows notebook.
Database client (SQL Developer) on my local Windows notebook.
Preparation
Step 1: Create a Bastion Service
From the Cloud Console, search for “Bastion” and click on the “Bastion” service in “Identity & Security”.
Click on “Create Bastion”, provide a name for your Bastion Service, select the target VCN and subnet, provide a CIDR block that you want to allow to connect to the target resources, and create the Bastion.
In this case, for simplicity, I’m allowing access from everywhere (0.0.0.0/0)
Step 2: Create a Connection in your Bastion
After the Bastion got created, click on the Bastion name to access the Bastion details page.
Click on “Create Session”. For session type, select “SSH port forwarding session”. Provide a session name. Choose “IP Address” to connect to the target and provide your target IP address. Enter port 22. Choose or paste your SSH public key and create the session.
Create SSH Connection
Step 3: Copy the SSH Command
After the session got created in step 2, click on the dotted menu on the very right side of the session, then click on “Copy SSH Command”.
Paste the SSH command in your favorite text editor and adjust the values for the private key and local port.
Execute the command from step 3 in your terminal session. Here, I’m using Git Bash on my Windows notebook.
The SSH tunnel is established. Keep this session active and open a second terminal window to connect to your private resource.
ssh-i /c/Users/SPETRUS/.ssh/id_rsaopc@localhost
That’s it! We are connected to the target private host in OCI.
Connect to a Database
If case you want to connect to a database directly instead of connecting to the database host, then create a new Bastion session using target port 1521, establish the SSH tunnel, and connect to your database using a database client, e.g. SQL Developer.
Conclusion
The Bastion Service enables you to access private resources in OCI without deploying and maintaining a public subnet and a jump server, which eliminates the hassle and potential attack surface from remote access. Security posture is improved by using identity-based permissions and centralized, audited, and time-bound SSH sessions.
Please find out all of our articles send us the Invitation or Follow us:
Software is usually installed via command-line tools. It can be automated, scheduled, and repeated with minimal effort. However, for quick testing and demo purposing, or when you are new to some products, you might prefer discovering the new options using a graphical interface. For example, when installing Oracle Grid Infrastructure, Oracle Database, or Oracle Database Client. Tip: when you need an Oracle Database and quickly get started, just provision one on Oracle Cloud, fully automated.
This blog post provides a step-by-step guide on enabling X11 on your Linux server and forwarding the program display to your local Windows machine.
The Environment
Oracle Linux VM on Oracle Cloud.
Local Windows machine with PuTTY as SSH client and Xming as X Window server.
Preparation
Step 1: Install PuTTY and Xming
Download and install PuTTY and Xming on your local Windows machine.
Step 2: Install the required packages on the Linux server
On your Linux server, install the xorg-x11-xauth package:
sudoyum installxorg-x11-xauth -y
Step 3: Configure X11 forwarding on the Linux server
On your Linux server, make sure that /etc/ssh/sshd_config file contains the following option:
sudovi/etc/ssh/sshd_config
...
X11Forwarding yes
...
If you made changes to the sshd_config file, restart the sshd service:
sudosystemctl stop sshd.service
sudosystemctl start sshd.service
sudosystemctl enablesshd.service
Connection
Step 4: Configure and start Xming
Configure and start Xming via the provided XLaunch utility. Search for the XLunch application and start it. Keep the defaults, click Next, then Finish:
Step 5: Establish an SSH connection via PuTTY
In your PuTTY session, enable the X11 forwarding checkbox and establish the connection:
Step 6: Test display forwarding
To test the display forwarding, install and start the xclock application:
sudoyum installxclock -y
xclock
The clock graphical application will be shown on your Windows machine:
Xming will show the currently 1 client connected.
Troubleshooting
If you are still getting the “Can’t open display” error message. Restart your PuTTY session. When the session opens, you might see the “file /home/opc/.Xauthority does not exist” message. Nevertheless, display forwarding will work now. The message does not appear anymore when you start a new session again.
select to_char(creation_time, 'MM-RRRR') "Month",
sum(bytes)/1024/1024/1024 "Growth in GB"
from sys.v_$datafile
where to_char(creation_time,'RRRR')='2022'
group by to_char(creation_time, 'MM-RRRR')
order by  to_char(creation_time, 'MM-RRRR');
Tablespace level database growth:
select b.tsname tablespace_name , MAX(b.used_size_mb) cur_used_size_mb , round(AVG(inc_used_size_mb),2)avg_increas_mb
from ( SELECT a.days,a.tsname , used_size_mb , used_size_mb - LAG (used_size_mb,1) OVER ( PARTITION BY a.tsname ORDER BY a.tsname,a.days) inc_used_size_mb
from ( SELECT TO_CHAR(sp.begin_interval_time,'MM-DD-YYYY') days  ,ts.tsname ,MAX(round((tsu.tablespace_usedsize* dt.block_size )/(1024*1024),2)) used_size_mb
from dba_hist_tbspc_space_usage  tsu , dba_hist_tablespace_stat  ts ,dba_hist_snapshot  sp, dba_tablespaces  dt   where tsu.tablespace_id= ts.ts#
AND tsu.snap_id = sp.snap_id
AND ts.tsname = dt.tablespace_name AND sp.begin_interval_time > sysdate-7
GROUP BY TO_CHAR(sp.begin_interval_time,'MM-DD-YYYY'), ts.tsname
ORDER BY ts.tsname, days ) a ) b GROUP BY b.tsname ORDER BY b.tsname;
To check the database growth:
SET LINESIZE 200
SET PAGESIZE 200
COL "Database Size" FORMAT a13
COL "Used Space" FORMAT a11
COL "Used in %" FORMAT a11
COL "Free in %" FORMAT a11
COL "Database Name" FORMAT a13
COL "Free Space" FORMAT a12
COL "Growth DAY" FORMAT a11
COL "Growth WEEK" FORMAT a12
COL "Growth DAY in %" FORMAT a16
COL "Growth WEEK in %" FORMAT a16
SELECT
(select min(creation_time) from v$datafile) "Create Time",
(select name from v$database) "Database Name",
ROUND((SUM(USED.BYTES) / 1024 / 1024 ),2) || ' MB' "Database Size",
ROUND((SUM(USED.BYTES) / 1024 / 1024 ) - ROUND(FREE.P / 1024 / 1024 ),2) || ' MB' "Used Space",
ROUND(((SUM(USED.BYTES) / 1024 / 1024 ) - (FREE.P / 1024 / 1024 )) / ROUND(SUM(USED.BYTES) / 1024 / 1024 ,2)*100,2) || '% MB' "Used in %",
ROUND((FREE.P / 1024 / 1024 ),2) || ' MB' "Free Space",
ROUND(((SUM(USED.BYTES) / 1024 / 1024 ) - ((SUM(USED.BYTES) / 1024 / 1024 ) - ROUND(FREE.P / 1024 / 1024 )))/ROUND(SUM(USED.BYTES) / 1024 / 1024,2 )*100,2) || '% MB' "Free in %",
ROUND(((SUM(USED.BYTES) / 1024 / 1024 ) - (FREE.P / 1024 / 1024 ))/(select sysdate-min(creation_time) from v$datafile),2) || ' MB' "Growth DAY",
ROUND(((SUM(USED.BYTES) / 1024 / 1024 ) - (FREE.P / 1024 / 1024 ))/(select sysdate-min(creation_time) from v$datafile)/ROUND((SUM(USED.BYTES) / 1024 / 1024 ),2)*100,3) || '% MB' "Growth DAY in %",
ROUND(((SUM(USED.BYTES) / 1024 / 1024 ) - (FREE.P / 1024 / 1024 ))/(select sysdate-min(creation_time) from v$datafile)*7,2) || ' MB' "Growth WEEK",
ROUND((((SUM(USED.BYTES) / 1024 / 1024 ) - (FREE.P / 1024 / 1024 ))/(select sysdate-min(creation_time) from v$datafile)/ROUND((SUM(USED.BYTES) / 1024 / 1024 ),2)*100)*7,3) || '% MB' "Growth WEEK in %"
FROM    (SELECT BYTES FROM V$DATAFILE
UNION ALL
SELECT BYTES FROM V$TEMPFILE
UNION ALL
SELECT BYTES FROM V$LOG) USED,
(SELECT SUM(BYTES) AS P FROM DBA_FREE_SPACE) FREE
GROUP BY FREE.P;
Find the current size of the database and the average disk space consumed each day.
SELECT b.tsname tablespace_name
, MAX(b.used_size_mb) cur_used_size_mb
, round(AVG(inc_used_size_mb),2)avg_increas_mb
FROM (
SELECT a.days,a.tsname
, used_size_mb
, used_size_mb - LAG (used_size_mb,1) OVER ( PARTITION BY a.tsname ORDER BY a.tsname,a.days) inc_used_size_mb
FROM (
SELECT TO_CHAR(sp.begin_interval_time,'MM-DD-YYYY') days
,ts.tsname
,MAX(round((tsu.tablespace_usedsize* dt.block_size )/(1024*1024),2)) used_size_mb
FROM DBA_HIST_TBSPC_SPACE_USAGE tsu
, DBA_HIST_TABLESPACE_STAT ts
,DBA_HIST_SNAPSHOT sp, DBA_TABLESPACES dt
WHERE tsu.tablespace_id= ts.ts# AND tsu.snap_id = sp.snap_id
AND ts.tsname = dt.tablespace_name AND sp.begin_interval_time > sysdate-7
GROUP BY TO_CHAR(sp.begin_interval_time,'MM-DD-YYYY'), ts.tsname
ORDER BY ts.tsname, days
) a
) b GROUP BY b.tsname ORDER BY b.tsname;
database growth per month:
select to_char(CREATION_TIME,'RRRR') year, to_char(CREATION_TIME,'MM') month, round(sum(bytes)/1024/1024/1024) GB
from   v$datafile
group by  to_char(CREATION_TIME,'RRRR'),   to_char(CREATION_TIME,'MM')
order by   1, 2;
Find DB Growth Per Month:
COLUMN month FORMAT a75
COLUMN growth FORMAT 999,999,999,999,999

SELECT
TO_CHAR(creation_time, ‘RRRR-MM’) “Month”,
SUM(bytes/1024/1024) “growth in MB”
FROM sys.v_$datafile
GROUP BY TO_CHAR(creation_time, ‘RRRR-MM’)
ORDER BY TO_CHAR(creation_time, ‘RRRR-MM’);
DB Growth per tablespace, average growth per day, and average week growth:
select min(creation_time) “Create Time”, ts.name, round(sum(df.bytes)/1024/1024) curr_size_mb,
round( (sum(df.bytes)/1024/1024)/round(sysdate-min(creation_time)),1) growth_per_day,
round( (sum(df.bytes)/1024/1024)/round(sysdate-min(creation_time)) * 7,1) growth_7_days
from v$datafile df ,v$tablespace ts where df.ts#=ts.ts# group by df.ts#,ts.name order by df.ts#;
Database Growth History and Forecast:
set serverout on
set verify off
set lines 200
set pages 2000
DECLARE
v_ts_id number;
not_in_awr EXCEPTION;
v_ts_block_size number;
v_begin_snap_id number;
v_end_snap_id number;
v_begin_snap_date date;
v_end_snap_date date;
v_numdays number;
v_count number;
v_ts_begin_size number;
v_ts_end_size number;
v_ts_growth number;
v_ts_begin_allocated_space number;
v_ts_end_allocated_space number;
v_db_begin_size number := 0;
v_db_end_size number := 0;
v_db_begin_allocated_space number := 0;
v_db_end_allocated_space number := 0;
v_db_growth number := 0;
cursor v_cur is select tablespace_name from dba_tablespaces where contents='PERMANENT';
BEGIN
FOR v_rec in v_cur
LOOP
BEGIN
v_ts_begin_allocated_space := 0;
v_ts_end_allocated_space := 0;
v_ts_begin_size := 0;
v_ts_end_size := 0;
SELECT ts# into v_ts_id FROM v$tablespace where name = v_rec.tablespace_name;
SELECT block_size into v_ts_block_size FROM dba_tablespaces where tablespace_name = v_rec.tablespace_name;
select count(*) into v_count from dba_hist_tbspc_space_usage where tablespace_id=v_ts_id;
IF v_count=0 THEN
RAISE not_in_awr;
END IF;
SELECT min(snap_id), max(snap_id), min(trunc(to_date(rtime,'MM/DD/YYYY HH24:MI:SS'))), max(trunc(to_date(rtime,'MM/DD/YYYY HH24:MI:SS')))
into v_begin_snap_id,v_end_snap_id, v_begin_snap_date, v_end_snap_date from dba_hist_tbspc_space_usage where tablespace_id=v_ts_id;
IF UPPER(v_rec.tablespace_name)='SYSTEM' THEN
v_numdays := v_end_snap_date - v_begin_snap_date;
END IF;
SELECT round(max(tablespace_size)*v_ts_block_size/1024/1024,2) into v_ts_begin_allocated_space from dba_hist_tbspc_space_usage where tablespace_id=v_ts_id and snap_id = v_begin_snap_id;
SELECT round(max(tablespace_size)*v_ts_block_size/1024/1024,2) into v_ts_end_allocated_space from dba_hist_tbspc_space_usage where tablespace_id=v_ts_id and snap_id = v_end_snap_id;
SELECT round(max(tablespace_usedsize)*v_ts_block_size/1024/1024,2) into v_ts_begin_size from dba_hist_tbspc_space_usage where tablespace_id=v_ts_id and snap_id = v_begin_snap_id;
SELECT round(max(tablespace_usedsize)*v_ts_block_size/1024/1024,2) into v_ts_end_size from dba_hist_tbspc_space_usage where tablespace_id=v_ts_id and snap_id = v_end_snap_id;
v_db_begin_allocated_space := v_db_begin_allocated_space + v_ts_begin_allocated_space;
v_db_end_allocated_space := v_db_end_allocated_space + v_ts_end_allocated_space;
v_db_begin_size := v_db_begin_size + v_ts_begin_size;
v_db_end_size := v_db_end_size + v_ts_end_size;
v_db_growth := v_db_end_size - v_db_begin_size;


END;
END LOOP;

DBMS_OUTPUT.PUT_LINE(CHR(10));
DBMS_OUTPUT.PUT_LINE('Summary');
DBMS_OUTPUT.PUT_LINE('========');
DBMS_OUTPUT.PUT_LINE('1) Allocated Space: '||v_db_end_allocated_space||' MB'||' ('||round(v_db_end_allocated_space/1024,2)||' GB)');
DBMS_OUTPUT.PUT_LINE('2) Used Space: '||v_db_end_size||' MB'||' ('||round(v_db_end_size/1024,2)||' GB)');
DBMS_OUTPUT.PUT_LINE('3) Used Space Percentage: '||round(v_db_end_size/v_db_end_allocated_space*100,2)||' %');
DBMS_OUTPUT.PUT_LINE(CHR(10));
DBMS_OUTPUT.PUT_LINE('History');
DBMS_OUTPUT.PUT_LINE('========');
DBMS_OUTPUT.PUT_LINE('1) Allocated Space on '||v_begin_snap_date||': '||v_db_begin_allocated_space||' MB'||' ('||round(v_db_begin_allocated_space/1024,2)||' GB)');
DBMS_OUTPUT.PUT_LINE('2) Current Allocated Space on '||v_end_snap_date||': '||v_db_end_allocated_space||' MB'||' ('||round(v_db_end_allocated_space/1024,2)||' GB)');
DBMS_OUTPUT.PUT_LINE('3) Used Space on '||v_begin_snap_date||': '||v_db_begin_size||' MB'||' ('||round(v_db_begin_size/1024,2)||' GB)' );
DBMS_OUTPUT.PUT_LINE('4) Current Used Space on '||v_end_snap_date||': '||v_db_end_size||' MB'||' ('||round(v_db_end_size/1024,2)||' GB)' );
DBMS_OUTPUT.PUT_LINE('5) Total growth during last '||v_numdays||' days between '||v_begin_snap_date||' and '||v_end_snap_date||': '||v_db_growth||' MB'||' ('||round(v_db_growth/1024,2)||' GB)');
IF (v_db_growth <= 0 OR v_numdays <= 0) THEN
DBMS_OUTPUT.PUT_LINE(CHR(10));
DBMS_OUTPUT.PUT_LINE('No data growth was found for the Database');
ELSE
DBMS_OUTPUT.PUT_LINE('6) Per day growth during last '||v_numdays||' days: '||round(v_db_growth/v_numdays,2)||' MB'||' ('||round((v_db_growth/v_numdays)/1024,2)||' GB)');
DBMS_OUTPUT.PUT_LINE(CHR(10));
DBMS_OUTPUT.PUT_LINE('Expected Growth');
DBMS_OUTPUT.PUT_LINE('===============');
DBMS_OUTPUT.PUT_LINE('1) Expected growth for next 30 days: '|| round((v_db_growth/v_numdays)*30,2)||' MB'||' ('||round(((v_db_growth/v_numdays)*30)/1024,2)||' GB)');
DBMS_OUTPUT.PUT_LINE('2) Expected growth for next 60 days: '|| round((v_db_growth/v_numdays)*60,2)||' MB'||' ('||round(((v_db_growth/v_numdays)*60)/1024,2)||' GB)');
DBMS_OUTPUT.PUT_LINE('3) Expected growth for next 90 days: '|| round((v_db_growth/v_numdays)*90,2)||' MB'||' ('||round(((v_db_growth/v_numdays)*90)/1024,2)||' GB)');
DBMS_OUTPUT.PUT_LINE(CHR(10));
DBMS_OUTPUT.PUT_LINE('/\/\/\/\/\/\/\/\/\/\/ END \/\/\/\/\/\/\/\/\/\/\');
END IF;
EXCEPTION
WHEN NOT_IN_AWR THEN
DBMS_OUTPUT.PUT_LINE(CHR(10));
DBMS_OUTPUT.PUT_LINE('====================================================================================================================');
DBMS_OUTPUT.PUT_LINE('!!! ONE OR MORE TABLESPACES USAGE INFORMATION NOT FOUND IN AWR !!!');
DBMS_OUTPUT.PUT_LINE('Execute DBMS_WORKLOAD_REPOSITORY.CREATE_SNAPSHOT, or wait for next AWR snapshot capture before executing this script');
DBMS_OUTPUT.PUT_LINE('====================================================================================================================');
END;
/
/##############################################
Thank you for giving your valuable time to read the above information.
If you want to be updated with all our articles send us the Invitation or Follow us:
Sequences are frequently used in databases because many applications require each row in a table to contain a unique value and sequences provide an easy way to generate them
How to find sequences in SQL:
Syntax: desc user_sequences;
How to create the sequence:
Syntax:
CREATE SEQUENCE schema_name
[INCREMENT BY interval]
[START WITH the first number]
[MAXVALUE max value | NOMAXVALUE]
[MINVALUE min value | NOMINVALUE]
[CYCLE | NOCYCLE]
[CACHE cache size | NOCACHE]
[ORDER | NOORDER];
Ex:
Create Table
Now, Create a sequence
Sequence created with conditions needs to be performed.
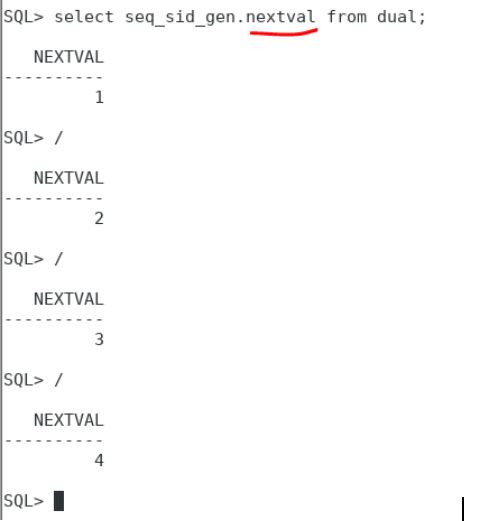
To See sequence’s current value:
Syntax: select seq_name.currvalue from dual;
Ex:
How to Alter sequence:
Syntax: Alter sequence seq_name
(conditions…….);
Ex:
How to Drop Sequence:
Syntax: Drop sequence sequence_name
Ex:
Thank you for giving your valuable time to read the above information.
If you want to be updated with all our articles send us the Invitation or Follow us: