RMAN-00571: =========================================================== RMAN-00569: =============== ERROR MESSAGE STACK FOLLOWS =============== RMAN-00571: =========================================================== RMAN-03002: failure of backup plus archivelog command at 07/12/2021 03:29:07 RMAN-06183: datafile or datafile copy +ORA_DATA/wwibetest_bosqeumcsdb/datafile/undotbs1.779.1077535587 (file number 3) larger than MAXSETSIZE
Finding and solution:
RMAN> show all;
using target database control file instead of recovery catalog
RMAN configuration parameters for database with db_unique_name WWIBEMCS_BOSQEUMCSDB201 are:
CONFIGURE RETENTION POLICY TO REDUNDANCY 1;
CONFIGURE BACKUP OPTIMIZATION ON;
CONFIGURE DEFAULT DEVICE TYPE TO DISK;
CONFIGURE CONTROLFILE AUTOBACKUP ON;
CONFIGURE CONTROLFILE AUTOBACKUP FORMAT FOR DEVICE TYPE DISK TO ‘/backup/oracle/WWIBEMCS/rman/WWIBEMCS_autobcf_%F’;
CONFIGURE DEVICE TYPE DISK PARALLELISM 4 BACKUP TYPE TO BACKUPSET;
CONFIGURE DATAFILE BACKUP COPIES FOR DEVICE TYPE DISK TO 1;
CONFIGURE ARCHIVELOG BACKUP COPIES FOR DEVICE TYPE DISK TO 1;
CONFIGURE CHANNEL DEVICE TYPE DISK FORMAT ‘/bck/oracle/%d/rman/%d_%Y%M%D_%u_s%s_p%p’;
CONFIGURE MAXSETSIZE TO 30 G;
CONFIGURE ENCRYPTION FOR DATABASE OFF; # default
CONFIGURE ENCRYPTION ALGORITHM ‘AES128’; # default
CONFIGURE COMPRESSION ALGORITHM ‘BASIC’ AS OF RELEASE ‘DEFAULT’ OPTIMIZE FOR LOAD TRUE ; # default
CONFIGURE ARCHIVELOG DELETION POLICY TO NONE;
CONFIGURE SNAPSHOT CONTROLFILE NAME TO ‘/wwi/wwdb/db/oracle/product/11.2.0.4/db_1/dbs/snapcf_WWIBEMCS.f’; # default
RMAN> CONFIGURE MAXSETSIZE TO 35 G;
old RMAN configuration parameters:
CONFIGURE MAXSETSIZE TO 30 G;
new RMAN configuration parameters:
CONFIGURE MAXSETSIZE TO 35 G;
new RMAN configuration parameters are successfully stored
RMAN> show all;
RMAN configuration parameters for database with db_unique_name WWIBEMCS_BOSQEUMCSDB201 are:
CONFIGURE RETENTION POLICY TO REDUNDANCY 1;
CONFIGURE BACKUP OPTIMIZATION ON;
CONFIGURE DEFAULT DEVICE TYPE TO DISK;
CONFIGURE CONTROLFILE AUTOBACKUP ON;
CONFIGURE CONTROLFILE AUTOBACKUP FORMAT FOR DEVICE TYPE DISK TO ‘/backup/oracle/WWIBEMCS/rman/WWIBEMCS_autobcf_%F’;
CONFIGURE DEVICE TYPE DISK PARALLELISM 4 BACKUP TYPE TO BACKUPSET;
CONFIGURE DATAFILE BACKUP COPIES FOR DEVICE TYPE DISK TO 1;
CONFIGURE ARCHIVELOG BACKUP COPIES FOR DEVICE TYPE DISK TO 1;
CONFIGURE CHANNEL DEVICE TYPE DISK FORMAT ‘/bck/oracle/%d/rman/%d_%Y%M%D_%u_s%s_p%p’;
CONFIGURE MAXSETSIZE TO 35 G;
Now I ran the RMAN backup it went successful.
Thank you for giving your valuable time to read the above information.
If you want to be updated with all our articles send us the Invitation or Follow us:
Description:
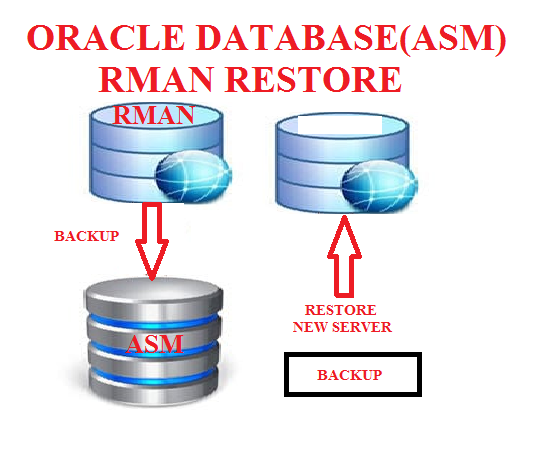
In this blog, we are going to see take RMAN backup in asm storage and restore the database to another server.
RMAN Restore ASM:
Take the backup using RMAN in source host copy the backup into destination host, using that backup files to restore the database.
Overall Steps:
Source server:
1. Backup Database using RMAN
2. Create pfile from spfile
3. Copy the backup files to the destination server
Destination server:
1. Edit pfile
2. Create Required Folders in destination server
3. Add the database entry in oratab
4. Startup using pfile Nomount stage
5. Restore control file
6. Mount database
7. Catalog backup pieces
8. Restore and recover the database
9. Change dbname/DBID uisng NID
10. verify the database name and id.
Source Server:
Step 1: Take backup using RMAN:
Create backup directory:
Backup script:
run {
allocate channel t1 type disk;
allocate channel t1 type disk;
allocate channel t1 type disk;
backup incremental level 0 database format ‘/u01/share/backup/database_%d_%u_%s’;
release channel t1;
}
sql ‘alter system archive log current’;
run {
allocate channel a1 type disk;
backup archivelog all format ‘/u01/share/backup/arch_%d_%u_%s’;
release channel a1;
}
run {
allocate channel c1 type disk;
backup current controlfile format ‘/u01/share/backup/Control_%d_%u_%s’;
release channel c1;
}
exit
Connect RMAN and execute the script:
[oracle@asm ~]$ rman target /
Recovery Manager: Release 19.0.0.0.0 – Production on Fri Jan 21 08:01:54 2022
Version 19.3.0.0.0
Copyright (c) 1982, 2019, Oracle and/or its affiliates. All rights reserved.
connected to target database: ORAASM (DBID=1977555372)
RMAN> @backup.rcv
RMAN> run {
2> allocate channel t1 type disk;
3> allocate channel t2 type disk;
4> allocate channel t3 type disk;
5> backup incremental level 0 database format ‘/u01/share/backup/database_%d_%u_%s’;
6> release channel t1;
7> release channel t2;
8> release channel t3;
9> }
using target database control file instead of recovery catalog
allocated channel: t1
channel t1: SID=78 device type=DISK
allocated channel: t3
channel t3: SID=88 device type=DISK
Starting backup at 21-JAN-22
channel t1: starting incremental level 0 datafile backup set
channel t1: specifying datafile(s) in backup set
input datafile file number=00001 name=+DATA/ORAASM/DATAFILE/system.257.1092813819
channel t1: starting piece 1 at 21-JAN-22
channel t2: starting incremental level 0 datafile backup set
channel t2: specifying datafile(s) in backup set
input datafile file number=00003 name=+DATA/ORAASM/DATAFILE/sysaux.258.1092813853
input datafile file number=00014 name=+DATA/ORAASM/DATAFILE/tblspace.281.1093044531
input datafile file number=00007 name=+DATA/ORAASM/DATAFILE/users.260.1092813869
channel t2: starting piece 1 at 21-JAN-22
channel t3: starting incremental level 0 datafile backup set
channel t3: specifying datafile(s) in backup set
input datafile file number=00004 name=+DATA/ORAASM/DATAFILE/undotbs1.259.1092813869
input datafile file number=00015 name=+DATA/ORAASM/DATAFILE/test.282.1094538795
input datafile file number=00013 name=+DATA/ORAASM/DATAFILE/tblspace.280.1093044407
channel t3: starting piece 1 at 21-JAN-22
channel t3: finished piece 1 at 21-JAN-22
piece handle=/u01/share/backup/database_ORAASM_080jqqo1_8 tag=TAG20220121T080204 comment=NONE
channel t3: backup set complete, elapsed time: 00:00:16
channel t3: starting incremental level 0 datafile backup set
channel t3: specifying datafile(s) in backup set
input datafile file number=00010 name=+DATA/ORAASM/D47CEAB72C2F2513E053867EA8C0538D/DATAFILE/sysaux.277.1092815375
input datafile file number=00011 name=+DATA/ORAASM/D47CEAB72C2F2513E053867EA8C0538D/DATAFILE/undotbs1.275.1092815375
channel t3: starting piece 1 at 21-JAN-22
channel t1: finished piece 1 at 21-JAN-22
piece handle=/u01/share/backup/database_ORAASM_060jqqns_6 tag=TAG20220121T080204 comment=NONE
channel t1: backup set complete, elapsed time: 00:01:10
channel t1: starting incremental level 0 datafile backup set
channel t1: specifying datafile(s) in backup set
input datafile file number=00006 name=+DATA/ORAASM/86B637B62FE07A65E053F706E80A27CA/DATAFILE/sysaux.271.1092814421
channel t1: starting piece 1 at 21-JAN-22
channel t2: finished piece 1 at 21-JAN-22
piece handle=/u01/share/backup/database_ORAASM_070jqqns_7 tag=TAG20220121T080204 comment=NONE
channel t2: backup set complete, elapsed time: 00:01:13
channel t2: starting incremental level 0 datafile backup set
channel t2: specifying datafile(s) in backup set
input datafile file number=00009 name=+DATA/ORAASM/D47CEAB72C2F2513E053867EA8C0538D/DATAFILE/system.276.1092815375
input datafile file number=00012 name=+DATA/ORAASM/D47CEAB72C2F2513E053867EA8C0538D/DATAFILE/users.279.1092815459
channel t2: starting piece 1 at 21-JAN-22
channel t3: finished piece 1 at 21-JAN-22
piece handle=/u01/share/backup/database_ORAASM_090jqqop_9 tag=TAG20220121T080204 comment=NONE
channel t3: backup set complete, elapsed time: 00:00:49
channel t3: starting incremental level 0 datafile backup set
channel t3: specifying datafile(s) in backup set
input datafile file number=00005 name=+DATA/ORAASM/86B637B62FE07A65E053F706E80A27CA/DATAFILE/system.270.1092814419
channel t3: starting piece 1 at 21-JAN-22
channel t1: finished piece 1 at 21-JAN-22
piece handle=/u01/share/backup/database_ORAASM_0a0jqqq2_10 tag=TAG20220121T080204 comment=NONE
channel t1: backup set complete, elapsed time: 00:00:12
channel t1: starting incremental level 0 datafile backup set
channel t1: specifying datafile(s) in backup set
input datafile file number=00008 name=+DATA/ORAASM/86B637B62FE07A65E053F706E80A27CA/DATAFILE/undotbs1.272.1092814421
channel t1: starting piece 1 at 21-JAN-22
channel t1: finished piece 1 at 21-JAN-22
piece handle=/u01/share/backup/database_ORAASM_0d0jqqqg_13 tag=TAG20220121T080204 comment=NONE
channel t1: backup set complete, elapsed time: 00:00:26
channel t2: finished piece 1 at 21-JAN-22
piece handle=/u01/share/backup/database_ORAASM_0b0jqqq9_11 tag=TAG20220121T080204 comment=NONE
channel t2: backup set complete, elapsed time: 00:00:27
channel t3: finished piece 1 at 21-JAN-22
piece handle=/u01/share/backup/database_ORAASM_0c0jqqqf_12 tag=TAG20220121T080204 comment=NONE
channel t3: backup set complete, elapsed time: 00:00:26
Finished backup at 21-JAN-22
Starting Control File and SPFILE Autobackup at 21-JAN-22
piece handle=+DATA/ORAASM/AUTOBACKUP/2022_01_21/s_1094544235.283.1094544237 comment=NONE
Finished Control File and SPFILE Autobackup at 21-JAN-22
released channel: t1
released channel: t2
released channel: t3
RMAN> sql ‘alter system archive log current’;
sql statement: alter system archive log current
RMAN> run {
2> allocate channel a1 type disk;
3> backup archivelog all format ‘/u01/share/backup/arch_%d_%u_%s’;
4> release channel a1;
5> }
allocated channel: a1
channel a1: SID=78 device type=DISK
Starting backup at 21-JAN-22
current log archived
channel a1: starting archived log backup set
channel a1: specifying archived log(s) in backup set
input archived log thread=1 sequence=16 RECID=1 STAMP=1094544242
input archived log thread=1 sequence=17 RECID=2 STAMP=1094544243
channel a1: starting piece 1 at 21-JAN-22
channel a1: finished piece 1 at 21-JAN-22
piece handle=/u01/share/backup/arch_ORAASM_0f0jqqrk_15 tag=TAG20220121T080403 comment=NONE
channel a1: backup set complete, elapsed time: 00:00:03
Finished backup at 21-JAN-22
Starting Control File and SPFILE Autobackup at 21-JAN-22
piece handle=+DATA/ORAASM/AUTOBACKUP/2022_01_21/s_1094544247.289.1094544249 comment=NONE
Finished Control File and SPFILE Autobackup at 21-JAN-22
released channel: a1
RMAN> run {
2> allocate channel c1 type disk;
3> backup current controlfile format ‘/u01/share/backup/Control_%d_%u_%s’;
4> release channel c1;
5> }
allocated channel: c1
channel c1: SID=78 device type=DISK
Starting backup at 21-JAN-22
channel c1: starting full datafile backup set
channel c1: specifying datafile(s) in backup set
including current control file in backup set
channel c1: starting piece 1 at 21-JAN-22
channel c1: finished piece 1 at 21-JAN-22
piece handle=/u01/share/backup/Control_ORAASM_0h0jqqrs_17 tag=TAG20220121T080412 comment=NONE
channel c1: backup set complete, elapsed time: 00:00:01
Finished backup at 21-JAN-22
Starting Control File and SPFILE Autobackup at 21-JAN-22
piece handle=+DATA/ORAASM/AUTOBACKUP/2022_01_21/s_1094544256.290.1094544257 comment=NONE
Finished Control File and SPFILE Autobackup at 21-JAN-22
released channel: c1
RMAN> exit
Recovery Manager complete.
Check the backup file location:
Step 2: Create pfile from spfile
create pfile=’/home/oracle/initasmora.ora’ from spfile; Step 3: Copy the backup file into destination server
run
{
ALLOCATE CHANNEL d1 DEVICE TYPE disk;
ALLOCATE CHANNEL d2 DEVICE TYPE disk;
set newname for datafile 1 to ‘+DATA’;
set newname for datafile 2 to ‘+DATA’;
set newname for datafile 3 to ‘+DATA’;
set newname for datafile 4 to ‘+DATA’;
set newname for datafile 5 to ‘+DATA’;
SQL “ALTER DATABASE RENAME FILE ”+DATA/oraasm/onlinelog/group_3.268.1092813965”
to ”+DATA”” ;
SQL “ALTER DATABASE RENAME FILE ”+DATA/oraasm/onlinelog/group_2.266.1092813951”
to ”+DATA”” ;
SQL “ALTER DATABASE RENAME FILE ”+DATA/oraasm/onlinelog/group_1.265.1092813949”
to ”+DATA”” ;
SET UNTIL SEQUENCE 12; <— 11+1
RESTORE DATABASE;
SWITCH DATAFILE ALL;
RECOVER DATABASE;
}
SQL> startup nomount pfile='initasmora.ora';
ORACLE instance started.

Total System Global Area 1269366784 bytes
Fixed Size                  2227984 bytes
Variable Size             838861040 bytes
Database Buffers          419430400 bytes
Redo Buffers                8847360 bytes
SQL> alter database mount;

Database altered.

SQL>

set db name and id:
[oracle@asm asmora]$ . oraenv
ORACLE_SID = [asmora] ?
The Oracle base remains unchanged with value /u01/app/oracle
[oracle@asm asmora]$ nid target=sys dbname=asmora
DBNEWID: Release 19.0.0.0.0 – Production on Fri Jan 21 09:09:50 2022
Copyright (c) 1982, 2019, Oracle and/or its affiliates. All rights reserved.
Password:
Connected to database ORAASM (DBID=1977555372)
Connected to server version 19.3.0
Control Files in database:
+DATA/ASMORA/CONTROLFILE/current.262.1092813933
+DATA/ASMORA/CONTROLFILE/current.261.1092813933
Change database ID and database name ORAASM to ASMORA? (Y/[N]) => y
Proceeding with operation
Changing database ID from 1977555372 to 65466533
Changing database name from ORAASM to ASMORA
Control File +DATA/ASMORA/CONTROLFILE/current.262.1092813933 – modified
Control File +DATA/ASMORA/CONTROLFILE/current.261.1092813933 – modified
Datafile +DATA/ORAASM/DATAFILE/system.257.109281381 – dbid changed, wrote new name
Datafile +DATA/ORAASM/DATAFILE/sysaux.258.109281385 – dbid changed, wrote new name
Datafile +DATA/ORAASM/DATAFILE/undotbs1.259.109281386 – dbid changed, wrote new name
Datafile +DATA/ORAASM/86B637B62FE07A65E053F706E80A27CA/DATAFILE/system.270.109281441 – dbid changed, wrote new name
Datafile +DATA/ORAASM/86B637B62FE07A65E053F706E80A27CA/DATAFILE/sysaux.271.109281442 – dbid changed, wrote new name
Datafile +DATA/ORAASM/DATAFILE/users.260.109281386 – dbid changed, wrote new name
Datafile +DATA/ORAASM/86B637B62FE07A65E053F706E80A27CA/DATAFILE/undotbs1.272.109281442 – dbid changed, wrote new name
Datafile +DATA/ORAASM/D47CEAB72C2F2513E053867EA8C0538D/DATAFILE/system.276.109281537 – dbid changed, wrote new name
Datafile +DATA/ORAASM/D47CEAB72C2F2513E053867EA8C0538D/DATAFILE/sysaux.277.109281537 – dbid changed, wrote new name
Datafile +DATA/ORAASM/D47CEAB72C2F2513E053867EA8C0538D/DATAFILE/undotbs1.275.109281537 – dbid changed, wrote new name
Datafile +DATA/ORAASM/D47CEAB72C2F2513E053867EA8C0538D/DATAFILE/users.279.109281545 – dbid changed, wrote new name
Datafile +DATA/ORAASM/DATAFILE/tblspace.280.109304440 – dbid changed, wrote new name
Datafile +DATA/ORAASM/DATAFILE/tblspace.281.109304453 – dbid changed, wrote new name
Datafile +DATA/ORAASM/DATAFILE/test.282.109453879 – dbid changed, wrote new name
Datafile +DATA/ORAASM/TEMPFILE/temp.269.109281404 – dbid changed, wrote new name
Datafile +DATA/ORAASM/D47CB418C2B91B66E053867EA8C0C5A0/TEMPFILE/temp.273.109281445 – dbid changed, wrote new name
Datafile +DATA/ORAASM/D47CEAB72C2F2513E053867EA8C0538D/TEMPFILE/temp.278.109281541 – dbid changed, wrote new name
Control File +DATA/ASMORA/CONTROLFILE/current.262.1092813933 – dbid changed, wrote new name
Control File +DATA/ASMORA/CONTROLFILE/current.261.1092813933 – dbid changed, wrote new name
Instance shut down
Database name changed to ASMORA.
Modify parameter file and generate a new password file before restarting.
Database ID for database ASMORA changed to 65466533.
All previous backups and archived redo logs for this database are unusable.
Database is not aware of previous backups and archived logs in Recovery Area.
Database has been shutdown, open database with RESETLOGS option.
Succesfully changed database name and ID.
DBNEWID – Completed succesfully.
[oracle@asm asmora]$
Step 10: check the DB name and id
SQL> alter database open resetlogs;
Database altered.
SQL> select name, open_mode, db_unique_name, dbid from v$database;
NAME OPEN_MODE DB_UNIQUE_NAME DBID
ASMORA READ WRITE asmora 65466533
Thank you for giving your valuable time to read the above information.
If you want to be updated with all our articles send us the Invitation or Follow us:
This wait event happens when a session tries to access a block in the buffer cache but it can't because the buffer is busy, that is another session is modifying the block and the contents of the block are in flux.
Buffer Busy Wait:
SQL> SELECT s.sql_hash_value, sw.p1 file#, sw.p2 block#, sw.p3 reason
FROM v$session_wait sw, v$session s
WHERE sw.event = 'buffer busy waits'
AND sw.sid = s.sid;

no rows selected
SQL> SELECT  owner , segment_name , segment_type
FROM  dba_extents
WHERE  file_id = &FileNumber
AND  &BlockNumber BETWEEN block_id AND block_id + blocks -1;  2    3    4
Enter value for filenumber: 1
old   3: WHERE  file_id = &FileNumber
new   3: WHERE  file_id = 1
Enter value for blocknumber: 2
old   4: AND  &BlockNumber BETWEEN block_id AND block_id + blocks -1
new   4: AND  2 BETWEEN block_id AND block_id + blocks -1

no rows selected

Another query that can be very useful is finding the objects in the entire Oracle database that are suffering from "buffer busy waits". The following query gives the top 10 segments:
SQL> SELECT * FROM (
   SELECT owner, object_name, subobject_name, object_type,
          tablespace_name, value
   FROM v$segment_statistics
   WHERE statistic_name='buffer busy waits' and owner not like '%SYS%'
   ORDER BY value DESC)
WHERE ROWNUM <=10;

OWNER                OBJECT_NAME                    SUBOBJECT_NAME                 OBJECT_TYPE        TABLESPACE_NAME                  VALUE
-------------------- ------------------------------ ------------------------------ ------------------ ------------------------------ ----------
GSMADMIN_INTERNAL    DDLID$                                                        TABLE              SYSAUX                               0
XDB                  XDB$ROOT_INFO                                                 TABLE              SYSAUX                               0
XDB                  XDB$SCHEMA_URL                                                INDEX              SYSAUX                               0
DB File Sequential Read
The db file sequential read wait event has three parameters:
file#, first block#, and block count.
In Oracle Database 11g, this wait event falls under the User I/O wait class.


The Oracle process wants a block that is currently not in the SGA, and it is waiting for the database block to be read into the SGA from disk.

The two important numbers to look for are the TIME_WAITED and AVERAGE_WAIT by individual sessions.

Significant db file sequential read wait time is most likely an application issue.


This event occurs when a user tries to perform a Physical I/O while waiting for sequential reads from the Buffer cache. This type of situation usually occurs when the data on the table is accessed by using index, not full table scan, as a result of single block reading.
If this event occurs,  possible reasons are wrong index usage, index fragmentation, excessive I/O traffic on specific disks. To Solve this problem, Query should use Right index and fragmented indexes should be defragmented with Rebuild Index operation.
When you encounter this wait event, which appears very frequently in AWR and ADDM reports, we cannot always say that there is a problem. However, if this wait event takes place, if the database have ‘Enqueue’ and Latch Free and they are spending too much time, then database should be monitored.
DB File Scattered Read
This wait event occurs getting multiblock of physical blocks that are not physically close to each other (neighbors) into buffer cache Scattered, or during a full scan to the buffer cache. So Db file scattered read is to read multiple blocks I/O during the fast full scan.

A scattered read is usually a multiblock read. It can occur for a fast full scan (of an index) in addition to a full table scan. The db file scattered read wait event identifies that a full scan is occurring. When performing a full scan into the buffer cache, the blocks read are read into memory locations that are not physically adjacent to each other.

Multiblock (up to DB_FILE_MULTIBLOCK_READ_COUNT blocks) reads due to full scans into the buffer cache show up as waits for 'db file scattered read'.
Direct path Read
 This event occurs when Oracle Instance query data from the Datafiles asynchronously and puts this data into PGA  instead of Buffer Cache in SGA.
This type of event usually occurs during the use of Temporary ( Temp ) Tablespace in the Sorting operations, during the creation of Lob segments, and when multiple sessions Full table scan in parallel.
In order to solve this problem, the memory should be increased, parallel operations should not be done unless required, and pay attention to Lob segments reads.
DB CPU
This event represents the total time spent of the users’ queries on the CPU.  Oracle’s Background processes (SMON, PMON ..) are not included in this total time.
If this value is high, it means that the Oracle instance spends most of the time on the CPU. To reduce this wait event, the SQLs in the SQL ordered by CPU section in the AWR report must be TUNE.
Logfile sync
 This event is known as the time lost as a result of the LGWR process waiting while users initiate a Transaction Commit or Rollback.
If this wait event is available continuously, I/O performance of the LGWR process is probably poor, or Commit is coming too often by the application. The solution to this problem is not to commit too much, if necessary, and to examine the I/O performance of the disk on which the Redo log files are located, and to use a high performance disk such as an SSD disk if necessary.
Enq: TX – row lock contention
 row lock contention:  This type of event occurs when a user session is trying to update or delete a row held by another session, which is an application design problem. Normally, when a transaction is finished, commit or rollback must be executed to release related rows.
The solution to this problem is that if the session that holds the row is active, then execute commit statement, if it is not active, kill the session or execute rollback the session.
ARCH wait on SENDREQ
This wait event is the total time taken by the Archiver Processes to archive the Standby in the Dataguard and to write these archives to the local disks.
The main reason why this value is high is that the archives sent to the Standby side arrive late due to the network. To solve this problem, it is necessary to optimize the Network and set the DEFAULT_SDU_SIZE parameter in the sqlnet.ora file to an optimized value (32767).
Gc current block busy
 This wait event occurs between the nodes of the Cluster database ( Real Application Cluster ). When a transaction requests a block, that request sent to the master instance. Normally, this request is performed by a cache fusion.
However, in some cases, this block transfer is delayed because the corresponding instance is held by the other instance or because the corresponding transaction records cannot be written to the redo logs immediately, in which case this wait event is triggered.
This can be solved by tune the wait event Log Writer process or Solving network problem between Cluster nodes.
Gc cr block busy-wait
ifference is that while the above event is running in current mode, this wait event runs in CR mode. This can be solved by tune the wait event Log Writer process.
Read by Other Session
When a session waits on the "read by other session" event, it indicates a wait for another session to read the data from disk into the Oracle buffer cache. If this happens too often the performance of the query or the entire database can suffer. Typically this is caused by contention for "hot" blocks or objects so it is imperative to find out which data is being contended for. Once that is known, there are several alternative methods for solving the issue.
When information is requested from the database, Oracle will first read the data from disk into the database buffer cache. If two or more sessions request the same information, the first session will read the data into the buffer cache while other sessions wait. In previous versions this wait was classified under the "buffer busy waits" event. However, in Oracle 10.1 and higher this wait time is now broken out into the "read by other session" wait event. Excessive waits for this event are typically due to several processes repeatedly reading the same blocks, e.g. many sessions scanning the same index or performing full table scans on the same table. Tuning this issue is a matter of finding and eliminating this contention.

Finding the contentions :
When a session is waiting on the "read by other session" event, an entry will be seen in the v$session_wait system view, which will give more information on the blocks being waited for:
SELECT p1 "file#", p2 "block#", p3 "class#"
FROM v$session_wait
WHERE event = 'read by other session';
If information collected from the above query repeatedly shows that the same block (or range of blocks) is experiencing waits, this indicates a "hot" block or object. The following query will give the name and type of the object:
SELECT relative_fno, owner, segment_name, segment_type
 FROM dba_extents
 WHERE file_id = &file
 AND &block BETWEEN block_id AND block_id + blocks - 1;

Eliminating contentions:
Depending on the Oracle database environment and specific performance situation the following variety of methods can be used to eliminate contention:
Tune inefficient queries - This is one of those events you need to "catch in the act" through the v$session_wait view as prescribed above. Then, since this is a disk operating system issue, take the associated system process identifier (c.spid) and see what information you can obtain from the operating system.
Redistribute data from the hot blocks - Deleting and reinserting the hot rows will often move them to a new data block. This will help decrease contention for the hot block and increase performance. More information about the data residing within the hot blocks can be retrieved with queries similar to the following:
SELECT data_object_id
 FROM dba_objects
 WHERE owner='&owner' AND object_name='&object';
SELECT dbms_rowid.rowid_create(1,<data_object_id>,<relative_fno>,<block>,0) start_rowid
 FROM dual;
--rowid for the first row in the block
 SELECT dbms_rowid.rowid_create(1,<data_object_id>,<relative_fno>,<block>,500) end_rowid FROM dual;
--rowid for the 500th row in the block
 SELECT <column_list>
 FROM <owner>.<segment_name>
 WHERE rowid BETWEEN <start_rowid> AND <end_rowid>
Thank you for giving your valuable time to read the above information.
If you want to be updated with all our articles send us the Invitation or Follow us:
Description: In this blog, we are going to see what has gathered stats and various levels of gather stats.
What is GATHERSTATS: To gather stats in oracle we require to use the DBMS_STATS package. It will collect the statistics in parallel with collecting the global statistics for partitioned objects. The DBMS_STATS package is specially used only for optimizer statistics. As I explained in the first paragraph the dbms_stats is very vital for good SQL performance. We require to gather the stats before adjusting or setting up any optimizer parameters in oracle.
The less the query cost the execution time of the query is fast. We must have to gather the statistics on regular basis for database objects to give the best information to the Oracle optimizer to run queries in the best possible time. Using the analysis statement is the traditional way of checking the cost of the query. But nowadays to gather stats in oracle we need to use the DBMS_STATS package.
Gather STATS:
CASCADE => TRUE: Gather statistics on the indexes as well. If not used
Oracle will determine whether to collect it or not.
DEGREE => 4: Degree of parallelism.
ESTIMATE_PERCENT => DBMS_STATS.AUTO_SAMPLE_SIZE : (DEFAULT) Auto set
the sample size % for skew(distinct) values (accurate and faster than
setting a manual sample size).
METHOD_OPT=> : For gathering Histograms:
FOR COLUMNS SIZE AUTO: You can specify one column between “”
instead of all columns.
FOR ALL COLUMNS SIZE REPEAT: Prevent deletion of histograms and collect
it only for columns that already have histograms.
FOR ALL COLUMNS: Collect histograms on all columns.
FOR ALL COLUMNS SIZE SKEWONLY: Collect histograms for columns that have
skewed values should test skewness first
FOR ALL INDEXED COLUMNS: Collect histograms for columns that
have indexes only.
DATABASE Level:
Gathering statistics for all objects in the database, the cascade will include indexes
The Automatic Workload Repository (AWR) collects and maintains statistics of the
database.
We can generate awr report for a particular time frame in the past using the script
awrrpt.sql ( located under $ORACLE_HOME/rdbms/admin)
script – @$ORACLE_HOME/rdbms/admin/awrrpt.sql
step – 1
[oratest@oracle ~]$ export ORACLE_SID=test
[oratest@oracle ~]$ sqlplus / as sysdba

SQL*Plus: Release 19.0.0.0.0 - Production on Thu Oct 7 11:06:50 2021
Version 19.3.0.0.0

Copyright (c) 1982, 2019, Oracle.  All rights reserved.


Connected to:
Oracle Database 19c Enterprise Edition Release 19.0.0.0.0 - Production
Version 19.3.0.0.0
SQL> select name,open_mode from v$database;

NAME      OPEN_MODE
--------- --------------------
TEST      READ ONLY

SQL> select status from v$instance;

STATUS
------------
OPEN

SQL> show user;
USER is "SYS"
step – 2
SQL>@$ORACLE_HOME/rdbms/admin/awrrpt.sql
Specify the Report Type
~~~~~~~~~~~~~~~~~~~~~~~
AWR reports can be generated in the following formats. Please enter the
name of the format at the prompt. Default value is 'html'.
'html' HTML format (default)
'text' Text format
'active-html' Includes Performance Hub active report
Enter value for report_type:<strong> <span style="color:#ed0911" <br />class="has-inline-color">html</span></strong>
old 1: select 'Type Specified: ',lower(nvl('&&report_type','html')) <br />report_type from dual
new 1: select 'Type Specified: ',lower(nvl('html','html')) <br />report_type from dual
Type Specified: html
old 1: select '&&report_type' report_type_def from dual
new 1: select 'html' report_type_def from dual
old 1: select '&&view_loc' view_loc_def from dual
new 1: select 'AWR_PDB' view_loc_def from dual
Current Instance
~~~~~~~~~~~~~~~~
DB Id DB Name Inst Num Instance Container Name
-------------- -------------- -------------- -------------- --------------
2378581000 TEST 1 test test
Instances in this Workload Repository schema
~~~~~~~~~~~~~~~~~~~~~~~~~~~~~~~~~~~~~~~~~~~~
DB Id Inst Num DB Name Instance Host
------------ ---------- --------- ---------- ------
* 2378581000 1 TEST test oracle.local
Using 2378581000 for database Id
Using 1 for instance number
Specify the number of days of snapshots to choose from
~~~~~~~~~~~~~~~~~~~~~~~~~~~~~~~~~~~~~~~~~~~~~~~~~~~~~~
Entering the number of days (n) will result in the most recent
(n) days of snapshots being listed. Pressing <return> without
specifying a number lists all completed snapshots.
Enter value for num_days: 2
Listing the last 2 days of Completed Snapshots
Instance DB Name Snap Id Snap Started Snap Level
------------ ------------ ---------- ------------------ ----------
test TEST 646 29 Sep 2021 00:30 1
647 29 Sep 2021 01:30 1
648 29 Sep 2021 02:30 1
649 29 Sep 2021 03:30 1
650 29 Sep 2021 04:30 1
651 29 Sep 2021 05:30 1
652 29 Sep 2021 06:30 1
653 30 Sep 2021 00:14 1
654 30 Sep 2021 01:30 1
655 30 Sep 2021 03:46 1
Specify the Begin and End Snapshot Ids
~~~~~~~~~~~~~~~~~~~~~~~~~~~~~~~~~~~~~~
Enter value for begin_snap:<strong><span style="color:#a3000d" <br />class="has-inline-color"> </span><span style="color:#ec0b1e" <br />class="has-inline-color">650</span></strong>
Begin Snapshot Id specified: 650
Enter value for end_snap: <strong><span style="color:#e90c17" <br />class="has-inline-color">651</span></strong>
</pre>
<!-- /wp:preformatted -->
<!-- wp:preformatted -->
<pre class="wp-block-preformatted">Specify the Report Name
~~~~~~~~~~~~~~~~~~~~~~~
The default report file name is awrrpt_1_650_651.html. To use this name,
press <return> to continue, otherwise enter an alternative.
Enter value for report_name: awrrpt_1_07_10_2021.html
Using the report name awrrpt_1_07_10_2021.html
--------------------------------------------
Analysis Period
---------------
AWR snapshot range from 650 to 651.
Time period starts at 29-SEP-21 04.30.25 AM
Time period ends at 29-SEP-21 05.30.33 AM
Analysis Target
---------------
Database 'TEST' with DB ID 2378581000.
Database version 19.0.0.0.0.
ADDM performed an analysis of instance test, numbered 1 and hosted at
oracle.localdomain.
Activity During the Analysis Period
-----------------------------------
Total database time was 0 seconds.
The average number of active sessions was 0.
~~~~~~~~~~~~~~~~~~~~~~~~~~~~~~~~~~~~~~~~~~~~~~~~~~~~~~~~~~~~~~~~~~~~~~~~~~~~~~
~~~~~~~~~~~~~~~~~~~~~~~~~~~~~~~~~~~~~~~~~~~~~~~~~~~~~~~~~~~~~~~~~~~~~~~~~~~~~~
There are no findings to report.
~~~~~~~~~~~~~~~~~~~~~~~~~~~~~~~~~~~~~~~~~~~~~~~~~~~~~~~~~~~~~~~~~~~~~~~~~~~~~~
~~~~~~~~~~~~~~~~~~~~~~~~~~~~~~~~~~~~~~~~~~~~~~~~~~~~~~~~~~~~~~~~~~~~~~~~~~~~~~
Additional Information
----------------------
Miscellaneous Information
-------------------------
There was no significant database activity to run the ADDM.
</pre>
<br /><a class="awr" href="#top">Back to Top</a><p />
<p />
<p />
<p />
<p />
<p />
<p />
<p />
<p />
<p />
End of Report
</body></html>
Report written to awrrpt_1_07_10_2021.html
Thank you for giving your valuable time to read the above information.
If you want to be updated with all our articles send us the Invitation or Follow us:
In this blog, we will see how to upgrade Oracle Database 12c to 19c using AutoUpgrade Tool
What is the AutoUpgrade?
The Oracle Database AutoUpgrade utility is a small command-line tool that allows you to upgrade your databases very easily with very little interaction
The new AutoUpgrade utility in Oracle 19¢ performs almost 99% of the task by itself, we just have to provide inputs during the initial phase
So it performs Prechecks against multiple databases, upgrades multiple databases in one go
Also, it does Post upgrade, object recompilation, and time zone up-gradation
The only thing you need to provide is a contig file in text format
Which database releases are supported?
As a source, the minimum version is Oracle Database 11.2.0.4. onwards
Download the latest auto-upgrade jar file
Auto upgrade utility autoupgrade.jar file exists by default under $ORACLE_HOME/rdbms/admin directory of Oracle 19c Home
Oracle strongly recommends downloading the latest AutoUpgrade version before doing the upgrade
You download the most recent version from MOS Note: 2485487.1 AutoUpgrade Tool
Once you download this jar file transfer it to the Server and create a new directory and place this file in that directory
prddb_config.cfg file should have following entry which specifies source and target database home location and DB name and log locations and other information’s:
Auto upgrade Analyze mode checks your database to see if it is ready for the upgrade. This will reads data from the database and does not perform any updates.
Execute AutoUpgrade in analyze mode with the below syntax:
Once the upgrade process is started consider monitoring the logs and database alert logs to see the progress of the upgrade. Auto upgrade logs are available under
/home/oracle/auto_upgrade_19c/upg_logs/
Once the upgrade finishes crosscheck the below.
SELECT VERSION FROM V$TIMEZONE_FILE;
select name, open_mode, version, status from v$database, v$instance;
Post-upgrade task
Once the upgrade is successful and all testing is done, drop the restore point.
Drop the Guaranteed restore point
select name from v$restore_point;
drop restore point restorepoint_name;
Change the compatible parameter
After the upgrade, the database has to be tested properly before updating the compatible parameter. Once the parameter is updated database cannot be downgraded.
show parameter compatible;
alter system set compatible=’19.0.0′ scope=spfile;
shutdown immediate:
startup;
show parameter compatible;
Hope this blog was useful…
Please find out all of our articles send us the Invitation or Follow us:
Upgradation is the process of replacing an older version/software with a new version of the product. It transforms the existing Oracle Database Environment into a new Environment. Upgradation can be done within the similar OS or with a different platform.
NOTE: It is important that we should apply the latest PSU or proactive bundle patch, RU, or RUR patch before starting an upgrade.
Why do we need to upgrade?
Upgrading a database generally fixes the bugs, internal errors and other technical issues which can be identified and resolved as soon as possible thereby it reduces the downtime.
You can perform a direct upgrade to the new release from the following releases: • 11.2.0.4 • 12.1.0.1 and 12.1.0.2 • 12.2.0.1
For example: Here I am converting my db from 12.2.0 (base version) to a 19.0.0 (higher version)
Types of Upgrade:
We can upgrade our DB in any one of the following methods,
1)DBUA (Database Upgrade Assistant)
2)Manual Method
3)Data Pump
4)Transportable Tablespaces
DATABASE UPGRADE ASSISTANT (DBUA) :
DBUA is a GUI method that checks all pre-requisties themselves.it checks for all the pre-requisties such as configuring the listener, recompiling the invaid objects, upgrading the time zone, running the preupgrade_fixups.sql,postupgrade_fixups.sql, configuring the enterprise manager (EM) database express, creating a Guaranteed Restore Point and all the things by itself.DBUA only performs the upgradation process if it satisfies all the above-mentioned things.
In the manual method, we should perform all the pre-requisties things manually.
Overview of steps to Upgrade a Database:
PRE-UPGRADE STEPS:
Create a new directory called backup, Take a backup of listener.ora,tnsnames.ora,spfile and password files ,then move all the files to the newly created directory called backup.
Create a new directory called upgrade,Run the preupgrade.jar file which is in the location
(/u01/app/oracle/product/12.2.0.1/db_1/jdk/bin/java -jar /u02/app/oracle/product/19.0.0/dbhome_1/rdbms/admin/preupgrade.jar),Move the summary of the preupgrade.script to the upgrade directory.
3.Three files named preupgrade.log,preupgrade_fixups.sql,postupgrade_fixups.sql files will be created after running the preupgrade.script.
4.We should execute the below scripts,
Before upgrade – @/u01/preupgrade/preupgrade_fixups.sql
After upgrade – @/u01/preupgrade/postupgrade_fixups.sql
5.Then check the preupgrade.log whether it is completed without any errors.
6. Verify the tablespace sizes for upgrade. (enable the AUTO EXTENT ON and set the maximum size for tablespaces)
7. Gather the dictionary statistics query to get the statistical data of fixed objects. we should gather dictionary statistics before and after the upgrade to maintain better DB performance.Because dictionary tables are modified and created during the upgrade.
8.Purge the recyclebin
9.Refresh all the materialised views before upgrade.
10.Run preupgrade_fixups.sql (/u01/upgrade/preupgrade_fixups.sql) before the upgrade.
11. You should enable the archive log list.
12.Create the flashback restore point before performing upgrade,it is important suppose if dbupgrade fails you can recover the database from this restore point.
13.Set the db_recovery_file_dest_size=10GB
UPGRADE TASK:
After we have completed all our pre-upgrade steps, Now it is time to upgrade our DB using dbua(GUI Method), All the steps will be taken by this.
Once you run the dbua command ,a log will be generated in the location (/u01/app/oracle/cfgtoollogs/dbua/upgrade2020-04-23_10-46-32PM) we can check this log file if any error occurs)
14.We should choose the database which is to be upgraded for 19c.
15. Next choose to Create a Guranteed Restore Point or RMAN backup in case of failure of upgrade. Double-check our restore point
16. Configure a new listener or upgrade the existing listener which is running up from 12.2.20.1 home to target 19c home.
17.Check if all the pre-requisites that we mentioned are correctly mentioned in the GUI.
POST UPGRADE STEPS:
18.Put an entry of current database in the vi /etc/oratab file.
19. Verify the timezone version of the upgraded database. (it should be changed to 32)
20. Then check for any invalid objects in the database after the upgrade.
21.We have to verify the DBA_REGISTRY view,it displays the information about the components loaded in the database.
22. Now we can drop the restore point that we have created already before the upgrade.
23.Update the compatible parameter value, it will be set in the base database version we have to update the upgraded db version in the compatible parameter value.
24. Finally check the listener.ora and tnsnames.ora files it should be updated to an upgraded db version.
Step:1 create a new directory for backup and for the upgrade.
Before upgrade: Log into the database and execute the preupgrade fixups
@/u01/preupgrade/preupgrade_fixups.sql
After the upgrade: Log into the database and execute the postupgrade fixups
@/u01/preupgrade/postupgrade_fixups.sql
Preupgrade complete: 2021-01-30T01:54:48
Step:4 Log in to the database and run the preupgrade_fixups.sql
[oracle@orcldbs db_1]$ !sq
sqlplus / as sysdba
SQL*Plus: Release 12.2.0.1.0 Production on Sat Jan 30 01:55:09 2021
Copyright (c) 1982, 2016, Oracle.  All rights reserved.
Connected to:
Oracle Database 12c Enterprise Edition Release 12.2.0.1.0 - 64bit Production
SQL> @/u01/preupgrade/preupgrade_fixups.sql
Executing Oracle PRE-Upgrade Fixup Script
Auto-Generated by:       Oracle Preupgrade Script
                         Version: 19.0.0.0.0 Build

Generated on:            2021-01-30 01:54:46
For Source Database:        GERMANY
Source Database Version: 12.2.0.1.0
For Upgrade to Version:  19.0.0.0.0
Preup                             Preupgrade
Action                            Issue Is
Number  Preupgrade Check Name     Remedied    Further DBA Action
------  ------------------------  ----------  --------------------------------
    1.  dictionary_stats          YES         None.

    2.  pre_fixed_objects         YES         None.

    3.  tablespaces_info          NO          Informational only.
                                              Further action is optional.
    4.  rman_recovery_version     NO          Informational only.
                                             Further action is optional.

PL/SQL procedure successfully completed.
Step:5 Gather the dictionary statistics it should be gathered after performing the upgrade.
SQL> SET ECHO ON;
SET SERVEROUTPUT ON;
EXECUTE DBMS_STATS.GATHER_DICTIONARY_STATS;

PL/SQL procedure successfully completed.
Step:6 Purge the recycle bin.it is mainly used to release the storage space used,since we have enabled the GRP we can purge the recycle bin.
PURGE DBA_RECYCLEBIN;

SQL>DBA_RECYCLEBIN purged.
Step:7 Refreshing the Materialised views update all its indexes.
 SQL>  declare
list_failures integer(3) :=0;
begin
DBMS_MVIEW.REFRESH_ALL_MVIEWS(list_failures,'C','', TRUE, FALSE);
end;

PL/SQL procedure successfully completed.
Step:8 Enable the archive log mode it is mandatory to perform an db upgrade.
SQL> archive log list
Database log mode              No Archive Mode
Automatic archival             Disabled
Archive destination            /u01/app/oracle/product/12.2.0.1/db_1/dbs/arch
Oldest online log sequence     1
Current log sequence           2
SQL> shut immediate
Database closed.
Database dismounted.
ORACLE instance shut down.
SQL> startup mount
ORACLE instance started.
Total System Global Area 2432696320 bytes
Fixed Size                  8623592 bytes
Variable Size             654314008 bytes
Database Buffers         1761607680 bytes
Redo Buffers                8151040 bytes
Database mounted.

SQL> alter database archivelog;

Database altered.

SQL> archive log list;

Database log mode              Archive Mode
Automatic archival             Enabled
Archive destination            /u01/app/oracle/product/12.2.0.1/db_1/dbs/arch
Oldest online log sequence     1
Next log sequence to archive   2
Current log sequence           2

SQL> show parameter rec

NAME                                 TYPE        VALUE
------------------------------------ ----------- ------------------------------
buffer_pool_recycle                  string

control_file_record_keep_time        integer     7

db_recovery_file_dest                string

db_recovery_file_dest_size           big integer 0

db_recycle_cache_size                big integer 0

db_unrecoverable_scn_tracking        boolean     TRUE

ldap_directory_access                string      NONE

ldap_directory_sysauth               string      no

recovery_parallelism                 integer     0

recyclebin                           string      on

remote_recovery_file_dest            string

SQL> select flashback_on from v$database;

FLASHBACK_ON
------------------
NO


SQL> select name,open_mode,log_mode from v$database;

NAME      OPEN_MODE            LOG_MODE
--------- -------------------- ------------
GERMANY   MOUNTED              ARCHIVELOG


SQL> show parameter db_recovery_file_dest_size

NAME                                 TYPE        VALUE
------------------------------------ ----------- ------------------------------
db_recovery_file_dest_size           big integer 0

SQL> alter database open;

Database altered.
Step:9 set the db_recovery_fil_dest_size to 10 gb for recovery purpose.
SQL> alter system set db_recovery_file_dest_size=10G;

System altered.
Step:10 create the GRP (Guarantee Restore Point) ,suppose if any failure occurs during upgradation we can easily go to the before upgrade of db (ie looks like as if our db before upgradation)it is used for recovery purpose.
SQL> create restore point pre_upgrade guarantee flashback database;

Restore point created.
SQL> select NAME,GUARANTEE_FLASHBACK_DATABASE,TIME from V$restore_point;

NAME                                                                      TIME                                                        GUA

PRE_UPGRADE                                            30-JAN-21 02.26.08.000000000 AM             YES
Step:11 We have done all the things to be done before the upgrade. Now it’s time to run the DBUA a GUI Utility to perform the upgrade.
11.1 you have to choose the database which you need to upgrade, here I am choosing Germany db for upgrade to 19.0.0 which is in version 12.2.0 and click next.
11.2 second window shows the Pre Upgrade Recommendations and Post Upgrade Recommendations and then click next.
11.3 in this screen click the following checkboxes,
Enable Parallel Upgrade
Recompile Invalid Objects During Post Upgrade
Upgrade Timezone Data
After that you have to browse the locations of preupgrade_fixups.sql,postupgrade_fixups.sql
11.4 In this screen you can specify any of the recovery option for the database in case of upgrade failure.
Here I am using Flashback and Guaranteed Restore Point.
There are methods are also available such that RMAN backup , use latest available full RMAN backup. if you have your own backup and restore strategy you can also use that.
11.5 Select the 12c listener, it should be up and running.
11.6 select the Configure Enterprise Manager (EM) database express check box and click next.
11.7 Finally this window shows the Database Upgrade summary you can verify all your selections that you have choose above are correctly mentioned and proceed further.
11.8 After that Oracle upgrade process starts.
11.9 when the upgradation process is over it give an upgrade results which db is upgraded from which version to which version. You can check here for information.
Step:12 Put an entry of the current database in the vi /etc/oratab file.
SQL*Plus: Release 19.0.0.0.0 - Production on Sat Jan 30 04:09:40 2021 Version 19.3.0.0.0 Copyright (c) 1982, 2019, Oracle. All rights reserved. Connected to: Oracle Database 19c Enterprise Edition Release 19.0.0.0.0 - Production Version 19.3.0.0.0
SQL> SELECT name from v$database;
NAME ---------------- GERMANY
Step:13 check the timezone version for the upgraded db (GERMANY) it has changed from 26(12c) to 32(19c).
SQL>  SELECT version FROM v$timezone_file;

   VERSION
----------------
     32
Step:14 Check for any invalid objects in upgraded database.
select count(1) from dba_objects where status='INVALID';

  COUNT(1)
------------------
     0
Step:15 Verify the dba_registry, it should be verified before and after the upgrade because it display information about the components loaded in the database.
SQL> col COMP_ID for a10 col COMP_NAME for a40 col VERSION for a15 set lines 180 set pages 999
select COMP_ID,COMP_NAME,VERSION,STATUS from dba_registry;
COMP_ID COMP_NAME VERSION STATUS ---------- ---------------------------------------- --------------- --------------------------------------------
[oracle@orcldbs ~]$ [oracle@orcldbs ~]$ lsnrctl status LSNRCTL for Linux: Version 19.0.0.0.0 - Production on 30-JAN-2021 04:17:17 Copyright (c) 1991, 2019, Oracle. All rights reserved. Connecting to (DESCRIPTION=(ADDRESS=(PROTOCOL=TCP)(HOST=192.168.1.26)(PORT=1521)))
STATUS of the LISTENER ------------------------
Alias LISTENER Version TNSLSNR for Linux: Version 19.0.0.0.0 - Production Start Date 30-JAN-2021 02:49:58 Uptime 0 days 1 hr. 27 min. 18 sec Trace Level off Security ON: Local OS Authentication SNMP OFF
Services Summary... Service "oraprod" has 2 instance(s). Instance "oraprod", status UNKNOWN, has 1 handler(s) for this service... Instance "oraprod", status READY, has 1 handler(s) for this service...
Service "oraprodXDB" has 1 instance(s). Instance "oraprod", status READY, has 1 handler(s) for this service...
Service "germany" has 1 instance(s). Instance "germany", status READY, has 1 handler(s) for this service...
Service "germanyXDB" has 1 instance(s). Instance "germany", status READY, has 1 handler(s) for this service...
The command completed successfully [oracle@orcldbs ~]$
Thank you for giving your valuable time to read the above information. If you want to be updated with all our articles send us the Invitation or Follow us: Ramkumar’s LinkedIn: https://www.linkedin.com/in/ramkumardba/ LinkedIn Group: https://www.linkedin.com/in/ramkumar-m-0061a0204/ Facebook Page: https://www.facebook.com/Oracleagent-344577549964301 Ramkumar’s Twitter: https://twitter.com/ramkuma02877110 Ramkumar’s Telegram: https://t.me/oracleageant Ramkumar’s Facebook: https://www.facebook.com/ramkumarram8
Thank you for giving your valuable time to read the above information. If you want to be updated with all our articles send us the Invitation or Follow us: