RMAN-00571: =========================================================== RMAN-00569: =============== ERROR MESSAGE STACK FOLLOWS =============== RMAN-00571: =========================================================== RMAN-03002: failure of backup plus archivelog command at 07/12/2021 03:29:07 RMAN-06183: datafile or datafile copy +ORA_DATA/wwibetest_bosqeumcsdb/datafile/undotbs1.779.1077535587 (file number 3) larger than MAXSETSIZE
Finding and solution:
RMAN> show all;
using target database control file instead of recovery catalog
RMAN configuration parameters for database with db_unique_name WWIBEMCS_BOSQEUMCSDB201 are:
CONFIGURE RETENTION POLICY TO REDUNDANCY 1;
CONFIGURE BACKUP OPTIMIZATION ON;
CONFIGURE DEFAULT DEVICE TYPE TO DISK;
CONFIGURE CONTROLFILE AUTOBACKUP ON;
CONFIGURE CONTROLFILE AUTOBACKUP FORMAT FOR DEVICE TYPE DISK TO ‘/backup/oracle/WWIBEMCS/rman/WWIBEMCS_autobcf_%F’;
CONFIGURE DEVICE TYPE DISK PARALLELISM 4 BACKUP TYPE TO BACKUPSET;
CONFIGURE DATAFILE BACKUP COPIES FOR DEVICE TYPE DISK TO 1;
CONFIGURE ARCHIVELOG BACKUP COPIES FOR DEVICE TYPE DISK TO 1;
CONFIGURE CHANNEL DEVICE TYPE DISK FORMAT ‘/bck/oracle/%d/rman/%d_%Y%M%D_%u_s%s_p%p’;
CONFIGURE MAXSETSIZE TO 30 G;
CONFIGURE ENCRYPTION FOR DATABASE OFF; # default
CONFIGURE ENCRYPTION ALGORITHM ‘AES128’; # default
CONFIGURE COMPRESSION ALGORITHM ‘BASIC’ AS OF RELEASE ‘DEFAULT’ OPTIMIZE FOR LOAD TRUE ; # default
CONFIGURE ARCHIVELOG DELETION POLICY TO NONE;
CONFIGURE SNAPSHOT CONTROLFILE NAME TO ‘/wwi/wwdb/db/oracle/product/11.2.0.4/db_1/dbs/snapcf_WWIBEMCS.f’; # default
RMAN> CONFIGURE MAXSETSIZE TO 35 G;
old RMAN configuration parameters:
CONFIGURE MAXSETSIZE TO 30 G;
new RMAN configuration parameters:
CONFIGURE MAXSETSIZE TO 35 G;
new RMAN configuration parameters are successfully stored
RMAN> show all;
RMAN configuration parameters for database with db_unique_name WWIBEMCS_BOSQEUMCSDB201 are:
CONFIGURE RETENTION POLICY TO REDUNDANCY 1;
CONFIGURE BACKUP OPTIMIZATION ON;
CONFIGURE DEFAULT DEVICE TYPE TO DISK;
CONFIGURE CONTROLFILE AUTOBACKUP ON;
CONFIGURE CONTROLFILE AUTOBACKUP FORMAT FOR DEVICE TYPE DISK TO ‘/backup/oracle/WWIBEMCS/rman/WWIBEMCS_autobcf_%F’;
CONFIGURE DEVICE TYPE DISK PARALLELISM 4 BACKUP TYPE TO BACKUPSET;
CONFIGURE DATAFILE BACKUP COPIES FOR DEVICE TYPE DISK TO 1;
CONFIGURE ARCHIVELOG BACKUP COPIES FOR DEVICE TYPE DISK TO 1;
CONFIGURE CHANNEL DEVICE TYPE DISK FORMAT ‘/bck/oracle/%d/rman/%d_%Y%M%D_%u_s%s_p%p’;
CONFIGURE MAXSETSIZE TO 35 G;
Now I ran the RMAN backup it went successful.
Thank you for giving your valuable time to read the above information.
If you want to be updated with all our articles send us the Invitation or Follow us:
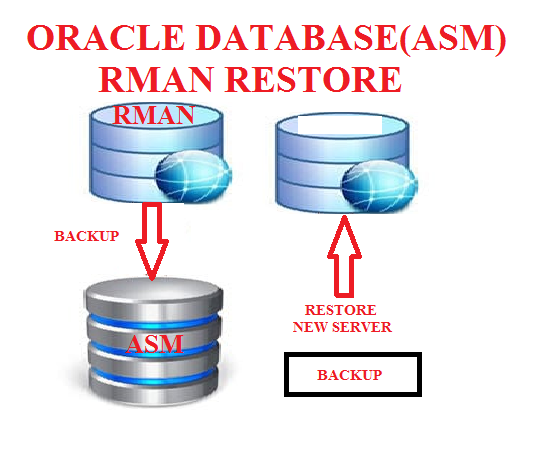
Description:
In this blog, we are going to see take RMAN backup in asm storage and restore the database to another server.
RMAN Restore ASM:
Take the backup using RMAN in source host copy the backup into destination host, using that backup files to restore the database.
Overall Steps:
Source server:
1. Backup Database using RMAN
2. Create pfile from spfile
3. Copy the backup files to the destination server
Destination server:
1. Edit pfile
2. Create Required Folders in destination server
3. Add the database entry in oratab
4. Startup using pfile Nomount stage
5. Restore control file
6. Mount database
7. Catalog backup pieces
8. Restore and recover the database
9. Change dbname/DBID uisng NID
10. verify the database name and id.
Source Server:
Step 1: Take backup using RMAN:
Create backup directory:
Backup script:
run {
allocate channel t1 type disk;
allocate channel t1 type disk;
allocate channel t1 type disk;
backup incremental level 0 database format ‘/u01/share/backup/database_%d_%u_%s’;
release channel t1;
}
sql ‘alter system archive log current’;
run {
allocate channel a1 type disk;
backup archivelog all format ‘/u01/share/backup/arch_%d_%u_%s’;
release channel a1;
}
run {
allocate channel c1 type disk;
backup current controlfile format ‘/u01/share/backup/Control_%d_%u_%s’;
release channel c1;
}
exit
Connect RMAN and execute the script:
[oracle@asm ~]$ rman target /
Recovery Manager: Release 19.0.0.0.0 – Production on Fri Jan 21 08:01:54 2022
Version 19.3.0.0.0
Copyright (c) 1982, 2019, Oracle and/or its affiliates. All rights reserved.
connected to target database: ORAASM (DBID=1977555372)
RMAN> @backup.rcv
RMAN> run {
2> allocate channel t1 type disk;
3> allocate channel t2 type disk;
4> allocate channel t3 type disk;
5> backup incremental level 0 database format ‘/u01/share/backup/database_%d_%u_%s’;
6> release channel t1;
7> release channel t2;
8> release channel t3;
9> }
using target database control file instead of recovery catalog
allocated channel: t1
channel t1: SID=78 device type=DISK
allocated channel: t3
channel t3: SID=88 device type=DISK
Starting backup at 21-JAN-22
channel t1: starting incremental level 0 datafile backup set
channel t1: specifying datafile(s) in backup set
input datafile file number=00001 name=+DATA/ORAASM/DATAFILE/system.257.1092813819
channel t1: starting piece 1 at 21-JAN-22
channel t2: starting incremental level 0 datafile backup set
channel t2: specifying datafile(s) in backup set
input datafile file number=00003 name=+DATA/ORAASM/DATAFILE/sysaux.258.1092813853
input datafile file number=00014 name=+DATA/ORAASM/DATAFILE/tblspace.281.1093044531
input datafile file number=00007 name=+DATA/ORAASM/DATAFILE/users.260.1092813869
channel t2: starting piece 1 at 21-JAN-22
channel t3: starting incremental level 0 datafile backup set
channel t3: specifying datafile(s) in backup set
input datafile file number=00004 name=+DATA/ORAASM/DATAFILE/undotbs1.259.1092813869
input datafile file number=00015 name=+DATA/ORAASM/DATAFILE/test.282.1094538795
input datafile file number=00013 name=+DATA/ORAASM/DATAFILE/tblspace.280.1093044407
channel t3: starting piece 1 at 21-JAN-22
channel t3: finished piece 1 at 21-JAN-22
piece handle=/u01/share/backup/database_ORAASM_080jqqo1_8 tag=TAG20220121T080204 comment=NONE
channel t3: backup set complete, elapsed time: 00:00:16
channel t3: starting incremental level 0 datafile backup set
channel t3: specifying datafile(s) in backup set
input datafile file number=00010 name=+DATA/ORAASM/D47CEAB72C2F2513E053867EA8C0538D/DATAFILE/sysaux.277.1092815375
input datafile file number=00011 name=+DATA/ORAASM/D47CEAB72C2F2513E053867EA8C0538D/DATAFILE/undotbs1.275.1092815375
channel t3: starting piece 1 at 21-JAN-22
channel t1: finished piece 1 at 21-JAN-22
piece handle=/u01/share/backup/database_ORAASM_060jqqns_6 tag=TAG20220121T080204 comment=NONE
channel t1: backup set complete, elapsed time: 00:01:10
channel t1: starting incremental level 0 datafile backup set
channel t1: specifying datafile(s) in backup set
input datafile file number=00006 name=+DATA/ORAASM/86B637B62FE07A65E053F706E80A27CA/DATAFILE/sysaux.271.1092814421
channel t1: starting piece 1 at 21-JAN-22
channel t2: finished piece 1 at 21-JAN-22
piece handle=/u01/share/backup/database_ORAASM_070jqqns_7 tag=TAG20220121T080204 comment=NONE
channel t2: backup set complete, elapsed time: 00:01:13
channel t2: starting incremental level 0 datafile backup set
channel t2: specifying datafile(s) in backup set
input datafile file number=00009 name=+DATA/ORAASM/D47CEAB72C2F2513E053867EA8C0538D/DATAFILE/system.276.1092815375
input datafile file number=00012 name=+DATA/ORAASM/D47CEAB72C2F2513E053867EA8C0538D/DATAFILE/users.279.1092815459
channel t2: starting piece 1 at 21-JAN-22
channel t3: finished piece 1 at 21-JAN-22
piece handle=/u01/share/backup/database_ORAASM_090jqqop_9 tag=TAG20220121T080204 comment=NONE
channel t3: backup set complete, elapsed time: 00:00:49
channel t3: starting incremental level 0 datafile backup set
channel t3: specifying datafile(s) in backup set
input datafile file number=00005 name=+DATA/ORAASM/86B637B62FE07A65E053F706E80A27CA/DATAFILE/system.270.1092814419
channel t3: starting piece 1 at 21-JAN-22
channel t1: finished piece 1 at 21-JAN-22
piece handle=/u01/share/backup/database_ORAASM_0a0jqqq2_10 tag=TAG20220121T080204 comment=NONE
channel t1: backup set complete, elapsed time: 00:00:12
channel t1: starting incremental level 0 datafile backup set
channel t1: specifying datafile(s) in backup set
input datafile file number=00008 name=+DATA/ORAASM/86B637B62FE07A65E053F706E80A27CA/DATAFILE/undotbs1.272.1092814421
channel t1: starting piece 1 at 21-JAN-22
channel t1: finished piece 1 at 21-JAN-22
piece handle=/u01/share/backup/database_ORAASM_0d0jqqqg_13 tag=TAG20220121T080204 comment=NONE
channel t1: backup set complete, elapsed time: 00:00:26
channel t2: finished piece 1 at 21-JAN-22
piece handle=/u01/share/backup/database_ORAASM_0b0jqqq9_11 tag=TAG20220121T080204 comment=NONE
channel t2: backup set complete, elapsed time: 00:00:27
channel t3: finished piece 1 at 21-JAN-22
piece handle=/u01/share/backup/database_ORAASM_0c0jqqqf_12 tag=TAG20220121T080204 comment=NONE
channel t3: backup set complete, elapsed time: 00:00:26
Finished backup at 21-JAN-22
Starting Control File and SPFILE Autobackup at 21-JAN-22
piece handle=+DATA/ORAASM/AUTOBACKUP/2022_01_21/s_1094544235.283.1094544237 comment=NONE
Finished Control File and SPFILE Autobackup at 21-JAN-22
released channel: t1
released channel: t2
released channel: t3
RMAN> sql ‘alter system archive log current’;
sql statement: alter system archive log current
RMAN> run {
2> allocate channel a1 type disk;
3> backup archivelog all format ‘/u01/share/backup/arch_%d_%u_%s’;
4> release channel a1;
5> }
allocated channel: a1
channel a1: SID=78 device type=DISK
Starting backup at 21-JAN-22
current log archived
channel a1: starting archived log backup set
channel a1: specifying archived log(s) in backup set
input archived log thread=1 sequence=16 RECID=1 STAMP=1094544242
input archived log thread=1 sequence=17 RECID=2 STAMP=1094544243
channel a1: starting piece 1 at 21-JAN-22
channel a1: finished piece 1 at 21-JAN-22
piece handle=/u01/share/backup/arch_ORAASM_0f0jqqrk_15 tag=TAG20220121T080403 comment=NONE
channel a1: backup set complete, elapsed time: 00:00:03
Finished backup at 21-JAN-22
Starting Control File and SPFILE Autobackup at 21-JAN-22
piece handle=+DATA/ORAASM/AUTOBACKUP/2022_01_21/s_1094544247.289.1094544249 comment=NONE
Finished Control File and SPFILE Autobackup at 21-JAN-22
released channel: a1
RMAN> run {
2> allocate channel c1 type disk;
3> backup current controlfile format ‘/u01/share/backup/Control_%d_%u_%s’;
4> release channel c1;
5> }
allocated channel: c1
channel c1: SID=78 device type=DISK
Starting backup at 21-JAN-22
channel c1: starting full datafile backup set
channel c1: specifying datafile(s) in backup set
including current control file in backup set
channel c1: starting piece 1 at 21-JAN-22
channel c1: finished piece 1 at 21-JAN-22
piece handle=/u01/share/backup/Control_ORAASM_0h0jqqrs_17 tag=TAG20220121T080412 comment=NONE
channel c1: backup set complete, elapsed time: 00:00:01
Finished backup at 21-JAN-22
Starting Control File and SPFILE Autobackup at 21-JAN-22
piece handle=+DATA/ORAASM/AUTOBACKUP/2022_01_21/s_1094544256.290.1094544257 comment=NONE
Finished Control File and SPFILE Autobackup at 21-JAN-22
released channel: c1
RMAN> exit
Recovery Manager complete.
Check the backup file location:
Step 2: Create pfile from spfile
create pfile=’/home/oracle/initasmora.ora’ from spfile; Step 3: Copy the backup file into destination server
run
{
ALLOCATE CHANNEL d1 DEVICE TYPE disk;
ALLOCATE CHANNEL d2 DEVICE TYPE disk;
set newname for datafile 1 to ‘+DATA’;
set newname for datafile 2 to ‘+DATA’;
set newname for datafile 3 to ‘+DATA’;
set newname for datafile 4 to ‘+DATA’;
set newname for datafile 5 to ‘+DATA’;
SQL “ALTER DATABASE RENAME FILE ”+DATA/oraasm/onlinelog/group_3.268.1092813965”
to ”+DATA”” ;
SQL “ALTER DATABASE RENAME FILE ”+DATA/oraasm/onlinelog/group_2.266.1092813951”
to ”+DATA”” ;
SQL “ALTER DATABASE RENAME FILE ”+DATA/oraasm/onlinelog/group_1.265.1092813949”
to ”+DATA”” ;
SET UNTIL SEQUENCE 12; <— 11+1
RESTORE DATABASE;
SWITCH DATAFILE ALL;
RECOVER DATABASE;
}
SQL> startup nomount pfile='initasmora.ora';
ORACLE instance started.

Total System Global Area 1269366784 bytes
Fixed Size                  2227984 bytes
Variable Size             838861040 bytes
Database Buffers          419430400 bytes
Redo Buffers                8847360 bytes
SQL> alter database mount;

Database altered.

SQL>

set db name and id:
[oracle@asm asmora]$ . oraenv
ORACLE_SID = [asmora] ?
The Oracle base remains unchanged with value /u01/app/oracle
[oracle@asm asmora]$ nid target=sys dbname=asmora
DBNEWID: Release 19.0.0.0.0 – Production on Fri Jan 21 09:09:50 2022
Copyright (c) 1982, 2019, Oracle and/or its affiliates. All rights reserved.
Password:
Connected to database ORAASM (DBID=1977555372)
Connected to server version 19.3.0
Control Files in database:
+DATA/ASMORA/CONTROLFILE/current.262.1092813933
+DATA/ASMORA/CONTROLFILE/current.261.1092813933
Change database ID and database name ORAASM to ASMORA? (Y/[N]) => y
Proceeding with operation
Changing database ID from 1977555372 to 65466533
Changing database name from ORAASM to ASMORA
Control File +DATA/ASMORA/CONTROLFILE/current.262.1092813933 – modified
Control File +DATA/ASMORA/CONTROLFILE/current.261.1092813933 – modified
Datafile +DATA/ORAASM/DATAFILE/system.257.109281381 – dbid changed, wrote new name
Datafile +DATA/ORAASM/DATAFILE/sysaux.258.109281385 – dbid changed, wrote new name
Datafile +DATA/ORAASM/DATAFILE/undotbs1.259.109281386 – dbid changed, wrote new name
Datafile +DATA/ORAASM/86B637B62FE07A65E053F706E80A27CA/DATAFILE/system.270.109281441 – dbid changed, wrote new name
Datafile +DATA/ORAASM/86B637B62FE07A65E053F706E80A27CA/DATAFILE/sysaux.271.109281442 – dbid changed, wrote new name
Datafile +DATA/ORAASM/DATAFILE/users.260.109281386 – dbid changed, wrote new name
Datafile +DATA/ORAASM/86B637B62FE07A65E053F706E80A27CA/DATAFILE/undotbs1.272.109281442 – dbid changed, wrote new name
Datafile +DATA/ORAASM/D47CEAB72C2F2513E053867EA8C0538D/DATAFILE/system.276.109281537 – dbid changed, wrote new name
Datafile +DATA/ORAASM/D47CEAB72C2F2513E053867EA8C0538D/DATAFILE/sysaux.277.109281537 – dbid changed, wrote new name
Datafile +DATA/ORAASM/D47CEAB72C2F2513E053867EA8C0538D/DATAFILE/undotbs1.275.109281537 – dbid changed, wrote new name
Datafile +DATA/ORAASM/D47CEAB72C2F2513E053867EA8C0538D/DATAFILE/users.279.109281545 – dbid changed, wrote new name
Datafile +DATA/ORAASM/DATAFILE/tblspace.280.109304440 – dbid changed, wrote new name
Datafile +DATA/ORAASM/DATAFILE/tblspace.281.109304453 – dbid changed, wrote new name
Datafile +DATA/ORAASM/DATAFILE/test.282.109453879 – dbid changed, wrote new name
Datafile +DATA/ORAASM/TEMPFILE/temp.269.109281404 – dbid changed, wrote new name
Datafile +DATA/ORAASM/D47CB418C2B91B66E053867EA8C0C5A0/TEMPFILE/temp.273.109281445 – dbid changed, wrote new name
Datafile +DATA/ORAASM/D47CEAB72C2F2513E053867EA8C0538D/TEMPFILE/temp.278.109281541 – dbid changed, wrote new name
Control File +DATA/ASMORA/CONTROLFILE/current.262.1092813933 – dbid changed, wrote new name
Control File +DATA/ASMORA/CONTROLFILE/current.261.1092813933 – dbid changed, wrote new name
Instance shut down
Database name changed to ASMORA.
Modify parameter file and generate a new password file before restarting.
Database ID for database ASMORA changed to 65466533.
All previous backups and archived redo logs for this database are unusable.
Database is not aware of previous backups and archived logs in Recovery Area.
Database has been shutdown, open database with RESETLOGS option.
Succesfully changed database name and ID.
DBNEWID – Completed succesfully.
[oracle@asm asmora]$
Step 10: check the DB name and id
SQL> alter database open resetlogs;
Database altered.
SQL> select name, open_mode, db_unique_name, dbid from v$database;
NAME OPEN_MODE DB_UNIQUE_NAME DBID
ASMORA READ WRITE asmora 65466533
Thank you for giving your valuable time to read the above information.
If you want to be updated with all our articles send us the Invitation or Follow us:
7. scan and list the disk using oracleasm: [root@asm dev]# oracleasm scandisks Reloading disk partitions: done Cleaning any stale ASM disks… Scanning system for ASM disks… [root@asm dev]# oracleasm listdisks DISK1 DISK2 [root@asm dev]#
8. asmcmd tool:
[oracle@asm ~]$ asmcmd ASMCMD> ASMCMD>
I. list the disk group ASMCMD> lsdg State Type Rebal Sector Logical_Sector Block AU Total_MB Free_MB Req_mir_free_MB Usable_file_MB Offline_disks Voting_files Name MOUNTED EXTERN N 512 512 4096 4194304 30712 25860 0 25860 0 N DATA/ ASMCMD>
II. list datafile,controlfile
ASMCMD> cd DATA/ ASMCMD> ls ASM/ ORAASM/ orapwasm ASMCMD> cd ORAASM ASMCMD> ls 86B637B62FE07A65E053F706E80A27CA/ CONTROLFILE/ D47CB418C2B91B66E053867EA8C0C5A0/ D47CEAB72C2F2513E053867EA8C0538D/ DATAFILE/ ONLINELOG/ PARAMETERFILE/ TEMPFILE/ ASMCMD> cd DATAFILE ASMCMD> ls SYSAUX.258.1092813853 SYSTEM.257.1092813819 UNDOTBS1.259.1092813869 USERS.260.1092813869 ASMCMD> pwd +DATA/ORAASM/DATAFILE ASMCMD>
9. check css,has status:
[oracle@asm ~]$ crsctl check has CRS-4638: Oracle High Availability Services is online [oracle@asm ~]$ crsctl check css CRS-4529: Cluster Synchronization Services is online [oracle@asm ~]$
10. check has version:
[oracle@asm ~]$ crsctl query has releaseversion Oracle High Availability Services release version on the local node is [19.0.0.0.0] [oracle@asm ~]$ crsctl query has softwareversion Oracle High Availability Services version on the local node is [19.0.0.0.0] [oracle@asm ~]$
11. asmca —> GUI for create and manage diskgroup:
12. KFOD – discovering disks with the help of asm disk strings: KFED – discovering disk headers
13. check olr and ocr location : [oracle@asm ~]$ ocrcheck Status of Oracle Cluster Registry is as follows : Version : 4 Total space (kbytes) : 491684 Used space (kbytes) : 82368 Available space (kbytes) : 409316 ID : 786336035 Device/File Name : /u01/app/grid/cdata/localhost/local.ocr Device/File integrity check succeeded
Device/File not configured
Device/File not configured
Device/File not configured
Device/File not configured
Cluster registry integrity check succeeded
Logical corruption check bypassed due to non-privileged user
[oracle@asm ~]$ [oracle@asm ~]$ ocrcheck -local Status of Oracle Local Registry is as follows : Version : 4 Total space (kbytes) : 491684 Used space (kbytes) : 83496 Available space (kbytes) : 408188 ID : 476403298 Device/File Name : /u01/app/oracle/crsdata/asm/olr/asm_19.olr Device/File integrity check succeeded
Local registry integrity check succeeded
Logical corruption check bypassed due to non-privileged user
[oracle@asm ~]$ ocrcheck -local -config Oracle Local Registry configuration is : Device/File Name : /u01/app/oracle/crsdata/asm/olr/asm_19.olr [oracle@asm ~]$
14. Check the asm status in sysasm admin:
[oracle@asm ~]$ sqlplus / as sysasm
SQL*Plus: Release 19.0.0.0.0 – Production on Sun Jan 2 17:57:52 2022 Version 19.3.0.0.0
Copyright (c) 1982, 2019, Oracle. All rights reserved.
Connected to: Oracle Database 19c Enterprise Edition Release 19.0.0.0.0 – Production Version 19.3.0.0.0
15. check instance type:
SQL> show parameter INSTANCE_TYPE
NAME TYPE VALUE ———————————— ———– —————————— instance_type string ASM
16. spfile location:
SQL> show parameter spfile
NAME TYPE VALUE ———————————— ———– —————————— spfile string +DATA/ASM/ASMPARAMETERFILE/reg istry.253.1092745689
17. pfile creation: SQL> create pfile from spfile;
File created.
SQL> exit Disconnected from Oracle Database 19c Enterprise Edition Release 19.0.0.0.0 – Production Version 19.3.0.0.0 [oracle@asm ~]$ cd $ORACLE_HOME/dbs [oracle@asm dbs]$ ls ab_+ASM.dat hc_+ASM.dat init+ASM.ora init.ora [oracle@asm dbs]$ cat init+ASM.ora +ASM.__oracle_base=’/u01/app/oracle’#ORACLE_BASE set from in memory value .asm_diskstring=’/dev/oracleasm/disks’ .asm_power_limit=1 .large_pool_size=12M .remote_login_passwordfile=’EXCLUSIVE’ [oracle@asm dbs]$ sqlplus / as sysasm
SQL*Plus: Release 19.0.0.0.0 – Production on Sun Jan 2 18:01:05 2022 Version 19.3.0.0.0
Copyright (c) 1982, 2019, Oracle. All rights reserved.
Connected to: Oracle Database 19c Enterprise Edition Release 19.0.0.0.0 – Production Version 19.3.0.0.0
18. instance type and status:
SQL> select instance_name,status from v$instance;
INSTANCE_NAME STATUS —————- ———— +ASM STARTED
SQL> exit Disconnected from Oracle Database 19c Enterprise Edition Release 19.0.0.0.0 – Production Version 19.3.0.0.0 [oracle@asm dbs]$ crsctl stat res -t ——————————————————————————– Name Target State Server State details ——————————————————————————– Local Resources ——————————————————————————– ora.DATA.dg ONLINE ONLINE asm STABLE ora.LISTENER.lsnr ONLINE ONLINE asm STABLE ora.asm ONLINE ONLINE asm Started,STABLE ora.ons OFFLINE OFFLINE asm STABLE ——————————————————————————– Cluster Resources ——————————————————————————– ora.cssd 1 ONLINE ONLINE asm STABLE ora.diskmon 1 OFFLINE OFFLINE STABLE ora.evmd 1 ONLINE ONLINE asm STABLE ora.oraasm.db 1 ONLINE ONLINE asm Open,HOME=/u01/app/o racle/product/19.0.0 /dbhome_1,STABLE ——————————————————————————– [oracle@asm dbs]$
19. ASMCMD check datafile and controlfile:
[oracle@asm dbs]$ asmcmd ASMCMD> ASMCMD> ASMCMD> ASMCMD> lsdg State Type Rebal Sector Logical_Sector Block AU Total_MB Free_MB Req_mir_free_MB Usable_file_MB Offline_disks Voting_files Name MOUNTED EXTERN N 512 512 4096 4194304 30712 25852 0 25852 0 N DATA/ ASMCMD> cd +DATA/oraasm/datafile ASMCMD> ls SYSAUX.258.1092813853 SYSTEM.257.1092813819 UNDOTBS1.259.1092813869 USERS.260.1092813869 ASMCMD> ls -l Type Redund Striped Time Sys Name DATAFILE UNPROT COARSE JAN 02 17:00:00 Y SYSAUX.258.1092813853 DATAFILE UNPROT COARSE JAN 02 17:00:00 Y SYSTEM.257.1092813819 DATAFILE UNPROT COARSE JAN 02 17:00:00 Y UNDOTBS1.259.1092813869 DATAFILE UNPROT COARSE JAN 02 17:00:00 Y USERS.260.1092813869 ASMCMD>
ASMCMD> cd +DATA/oraasm/parameterfile
ASMCMD> ls -l Type Redund Striped Time Sys Name PARAMETERFILE UNPROT COARSE JAN 02 17:00:00 Y spfile.274.1092815069 ASMCMD>
ASMCMD> ls -l Type Redund Striped Time Sys Name ASMPARAMETERFILE UNPROT COARSE DEC 31 12:00:00 Y REGISTRY.253.1092745689 ASMCMD> pwd +DATA/ASM/ASMPARAMETERFILE ASMCMD>
20. query to check asm_disk and asm disk_group:
SQL> select disk_number,name,path,header_status,mode_status,state,total_mb,free_mb from v$asm_disk;
DISK_NUMBER NAME PATH HEADER_STATU MODE_ST STATE TOTAL_MB FREE_MB —————————————————————————————————- 0 DATA_0000 /dev/oracleasm/disks/DISK1 MEMBER ONLINE NORMAL 20476 17228
1 DATA_0001 /dev/oracleasm/disks/DISK2 MEMBER ONLINE NORMAL 10236 8624
SQL> select group_number,name,state,type from v$asm_diskgroup;
GROUP_NUMBER NAME STATE TYPE ———— —————————— ———– —— 1 DATA MOUNTED EXTERN
SQL>
Thank you for giving your valuable time to read the above information.
If you want to be updated with all our articles send us the Invitation or Follow us:
Description: In this blog, we are going to see step by step process for adding a disk in ASM disk group.
Rebalance ASM Disks: Oracle ASM automatically rebalances disk groups when their configuration changes. You might want to do a manual rebalance operation to control the speed of what would otherwise be an automatic rebalance operation.
Pre request- Add needed disk space in virtual machine.
Steps:-
1. Login as root user source the bash profile:
[oracle@asm ~]$ . .bash_profile [oracle@asm ~]$ su root Password: [root@asm oracle]# [root@asm oracle]# cd
2. New disk configuration:
[root@asm ~]# fdisk /dev/sdd Welcome to fdisk (util-linux 2.23.2).
Changes will remain in memory only until you decide to write them. Be careful before using the write command.
The device does not contain a recognized partition table Building a new DOS disklabel with disk identifier 0xf8f5f5c6.
Command (m for help): m Command action a toggle a bootable flag b edit bsd disklabel c toggle the dos compatibility flag d delete a partition g create a new empty GPT partition table G create an IRIX (SGI) partition table l list known partition types m print this menu n add a new partition o create a new empty DOS partition table p print the partition table q quit without saving changes s create a new empty Sun disklabel t change a partition’s system id u change display/entry units v verify the partition table w write table to disk and exit x extra functionality (experts only)
Command (m for help): n Partition type: p primary (0 primary, 0 extended, 4 free) e extended Select (default p): Using default response p Partition number (1-4, default 1): First sector (2048-10485759, default 2048): Using default value 2048 Last sector, +sectors or +size{K,M,G} (2048-10485759, default 10485759): Using default value 10485759 Partition 1 of type Linux and of size 5 GiB is set
Command (m for help): w The partition table has been altered!
Calling ioctl() to re-read partition table. Syncing disks.
3. List the disks:
[root@asm ~]# fdisk -l
Disk /dev/sda: 107.4 GB, 107374182400 bytes, 209715200 sectors Units = sectors of 1 * 512 = 512 bytes Sector size (logical/physical): 512 bytes / 512 bytes I/O size (minimum/optimal): 512 bytes / 512 bytes Disk label type: dos Disk identifier: 0x0001d229
Device Boot Start End Blocks Id System /dev/sda1 * 2048 14338047 7168000 83 Linux /dev/sda2 14338048 98306047 41984000 83 Linux /dev/sda3 98306048 182274047 41984000 83 Linux /dev/sda4 182274048 209715199 13720576 5 Extended /dev/sda5 182276096 196612095 7168000 82 Linux swap / Solaris
Disk /dev/sdb: 21.5 GB, 21474836480 bytes, 41943040 sectors Units = sectors of 1 * 512 = 512 bytes Sector size (logical/physical): 512 bytes / 512 bytes I/O size (minimum/optimal): 512 bytes / 512 bytes Disk label type: dos Disk identifier: 0xeba933f3
Device Boot Start End Blocks Id System /dev/sdb1 2048 41943039 20970496 83 Linux
Disk /dev/sdc: 10.7 GB, 10737418240 bytes, 20971520 sectors Units = sectors of 1 * 512 = 512 bytes Sector size (logical/physical): 512 bytes / 512 bytes I/O size (minimum/optimal): 512 bytes / 512 bytes Disk label type: dos Disk identifier: 0x330f95dd
Device Boot Start End Blocks Id System /dev/sdc1 2048 20971519 10484736 83 Linux
Disk /dev/sdd: 5368 MB, 5368709120 bytes, 10485760 sectors Units = sectors of 1 * 512 = 512 bytes Sector size (logical/physical): 512 bytes / 512 bytes I/O size (minimum/optimal): 512 bytes / 512 bytes Disk label type: dos Disk identifier: 0xf8f5f5c6
Device Boot Start End Blocks Id System /dev/sdd1 2048 10485759 5241856 83 Linux
This will configure the on-boot properties of the Oracle ASM library driver. The following questions will determine whether the driver is loaded on the boot and what permissions it will have. The current values will be shown in brackets (‘[]’). Hitting <ENTER> without typing an answer will keep that current value. Ctrl-C will abort.
Default user to own the driver interface [oracle]: Default group to own the driver interface [oinstall]: Start Oracle ASM library driver on boot (y/n) [y]: Scan for Oracle ASM disks on boot (y/n) [y]: Writing Oracle ASM library driver configuration: done [root@asm ~]#
SQL*Plus: Release 19.0.0.0.0 – Production on Thu Jan 6 06:13:02 2022 Version 19.3.0.0.0
Copyright (c) 1982, 2019, Oracle. All rights reserved.
Connected to: Oracle Database 19c Enterprise Edition Release 19.0.0.0.0 – Production Version 19.3.0.0.0
7. Check the disk group status: SQL> set lines 999; col diskgroup for a15 col diskname for a15 col path for a35 select a.name DiskGroup,b.name DiskName, b.total_mb, (b.total_mb-b.free_mb) Used_MB, b.free_mb,b.path,b.header_status from v$asm_disk b, v$asm_diskgroup a where a.group_number (+) =b.group_number order by b.group_number,b.name;SQL> SQL> SQL> SQL> 2 3
DISKGROUP DISKNAME TOTAL_MB USED_MB FREE_MB PATH HEADER_STATU ————— ————— ———- ———- ———- ———————————– ———— 0 0 0 /dev/oracleasm/disks/DISK3 PROVISIONED DATA DATA_0000 20476 3380 17096 /dev/oracleasm/disks/DISK1 MEMBER DATA DATA_0001 10236 1676 8560 /dev/oracleasm/disks/DISK2 MEMBER
8. Create a disk in asm using rebalance method:
SQL> alter diskgroup DATA add disk ‘/dev/oracleasm/disks/DISK3’ NAME DISK3 rebalance power 100;
Diskgroup altered.
9. Check the status of new disk group its shown as RUN:
SQL> col ERROR_CODE for a10 col PASS for a10 select * from v$asm_operation;SQL> SQL>
10. Check after some time it will show no rows selected so it can be created fine:
SQL> select * from v$asm_operation; no rows selected
11. View the disk group:
SQL> set lines 999; col diskgroup for a15 col diskname for a15 col path for a35 select a.name DiskGroup,b.name DiskName, b.total_mb, (b.total_mb-b.free_mb) Used_MB, b.free_mb,b.path,b.header_status from v$asm_disk b, v$asm_diskgroup a where a.group_number (+) =b.group_number order by b.group_number,b.name;SQL> SQL> SQL> SQL> 2 3
DISKGROUP DISKNAME TOTAL_MB USED_MB FREE_MB PATH HEADER_STATU ————— ————— ———- ———- ———- ———————————– ———— DATA DATA_0000 20476 2884 17592 /dev/oracleasm/disks/DISK1 MEMBER DATA DATA_0001 10236 1456 8780 /dev/oracleasm/disks/DISK2 MEMBER DATA DISK3 5116 728 4388 /dev/oracleasm/disks/DISK3 MEMBER
Thank you for giving your valuable time to read the above information.
If you want to be updated with all our articles send us the Invitation or Follow us:
Description: In this blog we are going to see datafile,logfile,and archivelog create,resize delete in the ASM oracle database server.
Oracle ASM:
Oracle ASM is a volume manager and a file system for Oracle database files that supports single-instance Oracle Database and Oracle Real Application Clusters (Oracle RAC) configurations. Oracle ASM is Oracle’s recommended storage management solution that provides an alternative to conventional volume managers, file systems, and raw devices.
ASM Disk Groups:
Oracle ASM uses disk groups to store data files; an Oracle ASM disk group is a collection of disks that Oracle ASM manages as a unit. Within a disk group, Oracle ASM exposes a file system interface for Oracle database files.
Check datafile logfile and archivelog location in ASM
SQL> select name from v$datafile; NAME ————————————————————————————————–
Description:
In this blog, we are going to see the step-by-step configuration for standalone ASM using the oracle restart method.
Standalone Database: The Oracle Grid Infrastructure for a standalone server is the Oracle software that provides system support for an Oracle database including volume management, file system, and automatic restart capabilities.
ASM server: Automatic Storage Management (ASM) is an integrated, high-performance database file system and disk manager. ASM is based on the principle that the database should manage storage instead of requiring an administrator to do it.
High Level Steps
Adding disk group in Virtual Machine Grid software Installation Oracle software installation ASM standalone DB using the DBCA tool.
Adding Disk Group in Virtual Machine:
Step 1: open virtual machine hardware menu clicks add button:
Step 2:- Select an independent option and click next:
Step 3:- select create a new virtual disk and click next:
Step 4:- select allocate all disk space now option:
Step 5:- Select the folder and create the Disk:
ASM Hard Disk added:
Step 6:- OS-level disk partition :
Power on the virtual machine and check fdisk -l Partition the disks:
fdisk/dev/sdb Configure ASMLib using the following command.
oracleasm configure -i create disk in OS level
/usr/sbin/oracleasm init
/usr/sbin/oracleasm createdisk DISK1 /dev/sdb1
Standby Out Off syncDescription: In this blog, we are going to see standby log out off sync how to check and sync the primary and standby logs.
Standby Log Sync: The primary database logs are synced with the standby database in case any issue delay happens in log sync we restart the MRP process and defer enable the log_dest_2 location in the primary database.
Overall Steps:-
1. Bring Down the standby database. 2. Create a user and do multiple log switches in the primary database. 3. Start the standby database, and check the log difference. 4. primary database defers and enables the dest 2. 5. Restart the MRP process in the standby database. 6. Check the log Sync status.
Step 2:- Create user and do multiple log switches in the primary database.
Check current archive log status: SQL> archive log list; Database log mode Archive Mode Automatic archival Enabled Archive destination USE_DB_RECOVERY_FILE_DEST Oldest online log sequence 9 Next log sequence to archive 11 Current log sequence 11
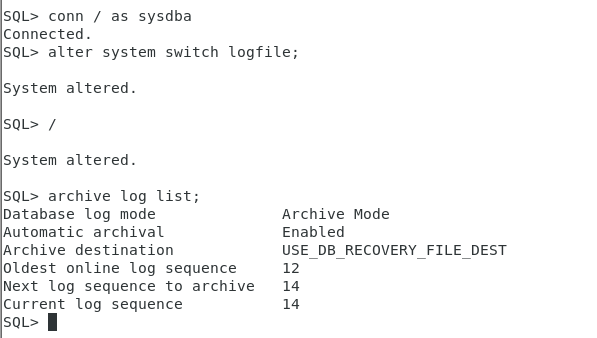
Create a user and insert the table. SQL> create user agent identified by agent; SQL> alter user agent default tablespace users quota unlimited on users; SQL> grant connect, resource to agent; SQL> conn agent/agent Connected. SQL> show user USER is “AGENT” SQL> create table agent1 as select * from user_tables; SQL> conn / as sysdba Connected.
Do multiple log switches. SQL> alter system switch logfile;
System altered.
SQL> /
System altered.
Check the archive log status. SQL> archive log list; Database log mode Archive Mode Automatic archival Enabled Archive destination USE_DB_RECOVERY_FILE_DEST Oldest online log sequence 12 Next log sequence to archive 14 Current log sequence 14 SQL>
Step 3:- Start the standby database, and check the log difference.
Total System Global Area 1258290752 bytes Fixed Size 8896064 bytes Variable Size 738197504 bytes Database Buffers 503316480 bytes Redo Buffers 7880704 bytes Database mounted. Database opened.
Check the log sync different. SQL> SELECT ARCH.THREAD# “Thread”, ARCH.SEQUENCE# “Last Sequence Received”, APPL.SEQUENCE# “Last Sequence Applied”, (ARCH.SEQUENCE# – APPL.SEQUENCE#) “Difference” FROM(SELECT THREAD# ,SEQUENCE# FROM V$ARCHIVED_LOG WHERE (THREAD#,FIRST_TIME ) IN (SELECT THREAD#,MAX(FIRST_TIME) FROM V$ARCHIVED_LOG GROUP BY THREAD#)) ARCH, (SELECT THREAD# ,SEQUENCE# FROM V$LOG_HISTORY WHERE (THREAD#,FIRST_TIME ) IN (SELECT THREAD#,MAX(FIRST_TIME) FROM V$LOG_HISTORY GROUP BY THREAD#)) APPL WHERE ARCH.THREAD# = APPL.THREAD# ORDER BY 1;
Step 4:-Primary database defer and enable the dest 2.
SQL> alter system set log_archive_dest_state_2=defer;
System altered.
SQL> alter system set log_archive_dest_state_2=enable;
System altered.
Step 5:- Restart the MRP process in the standby database.
SQL> alter database recover managed standby database disconnect nodelay;
Database altered.
Step 6:- Check the log sync status.
SQL> SELECT ARCH.THREAD# “Thread”, ARCH.SEQUENCE# “Last Sequence Received”, APPL.SEQUENCE# “Last Sequence Applied”, (ARCH.SEQUENCE# – APPL.SEQUENCE#) “Difference” FROM(SELECT THREAD# , SEQUENCE# FROM V$ARCHIVED_LOG WHERE (THREAD#, FIRST_TIME ) IN (SELECT THREAD#, MAX(FIRST_TIME) FROM V$ARCHIVED_LOG GROUP BY THREAD#)) ARCH, (SELECT THREAD# , SEQUENCE# FROM V$LOG_HISTORY WHERE (THREAD#, FIRST_TIME ) IN (SELECT THREAD#, MAX(FIRST_TIME) FROM V$LOG_HISTORY GROUP BY THREAD#)) APPL WHERE ARCH.THREAD# = APPL.THREAD# ORDER BY 1; 2 3 4
Description : In this blog, we are going to see oracle Data Guard Configuration parameters. and how to view and set the parameters.
Types of parameter configuration.Independent parameters.Primary database parameters.Standby database parameters.
Independent parameters: DB_UNIQUE_NAME: DB_UNIQUE_NAME specifies a globally unique name for the database. must have a unique DB_UNIQUE_NAME for every database.it can be up to 30 characters and is case insensitive. The following characters are valid in a database name: alphanumeric characters, underscore (_), the number sign (#), and dollar sign ($). db_unique_name=’unique_name’
SQL> show parameter db_unique_name NAME TYPE VALUE —————————– ———– ————— db_unique_name string orcl
LOG_ARCHIVE_CONFIG: LOG_ARCHIVE_CONFIG enables or disables the sending of redo logs to remote destinations and the receipt of remote redo logs, and specifies the unique database names (DB_UNIQUE_NAME) for each database in the Data Guard configuration. We can add send,nosend,receive,noreceive,dgconfig,nodgconfig to this log_archive_parameter. log_archive_config=’db_config=(Primary,Standby)’ SQL> show parameter LOG_ARCHIVE_CONFIG NAME TYPE VALUE ——————————— ———– ——————- log_archive_config string dg_config=(orcl,stand) change value to log_archive_config: SQL> ALTER SYSTEM SET log_archive_config=’dg_config=(orcl,stand)’ SCOPE=both; System altered.
LOG_ARCHIVE_MAX_PROCESSES: LOG_ARCHIVE_MAX_PROCESSES specifies the number of archiver background processes (ARC0 through ARC9) Oracle initially invokes. log_archivemax_processes=’4′
DB_CREATE_FILE_DEST: DB_CREATE_FILE_DEST specifies the default location for Oracle-managed datafiles. db_create_file_dest=’+DATA’ SQL> ALTER SYSTEM SET DB_CREATE_FILE_DEST=’/u02/oradata’;
Primary database parameters: LOG_ARCHIVE_DEST_n: The LOG_ARCHIVE_DEST_n initialization parameter defines up to ten destinations, each of which must specify either the LOCATION or the SERVICE attribute to specify where to archive the redo data. Location and service attributes are mandatory for the configuration. SERVICE – it can be a tnsnames entry to identify the database. SYNC – synchronous redo transmission. ASYNC – Asynchronous redo transmission.
LOGARCHIVE_DEST_STATE_n: Specify the availability state of the corresponding destination. enabled: Specifies that a valid log archive destination can be used for a subsequent archiving operation defer: Specifies that valid destination information and attributes are preserved, but the destination is excluded from archiving operations until re-enabled. alternate: Specifies that a log archive destination is not enabled but will become enabled if communications to another destination fail.
Standby Database Parameters: DB_FILE_NAME_CONVERT: It converts the filename of a new data file on the primary database to a filename on the standby database. SQL> show parameter DB_FILE_NAME_CONVERT NAME TYPE VALUE ——————————— ———– —————————— db_file_name_convert string /u01/app/oracle/oradata/ORCL/ , /u01/app/oracle/oradata/STAND/
LOG_FILE_NAME_CONVERT: LOG_FILE_NAME_CONVERT converts the filename of a new log file on the primary database to the filename of a log file on the standby database. SQL> show parameter LOG_FILE_NAME_CONVERT NAME TYPE VALUE ——————————— ——– ———— log_file_name_convert string /u01/app/oracle/oradata/ORCL/ , /u01/app/oracle/oradata/STAND alter system set db_file_name_convert=’/u02/oradata/orcl/datafile’ scope=spfile; alter system set log_file_name_convert=’orcl’,’stand’ scope=spfile;
FAL_SERVER: FAL means fetch archive log. It clearly indicates the name that fetches the archive log. FAL_SERVER is used to fetch an archive log server for a standby database. Value in FAL_SERVER parameter act as Oracle Net Service name which points to the standby database. ALTER SYSTEM SET fal_server=’stand ‘SCOPE=both; ALTER SYSTEM SET fal_client=’orcl ‘SCOPE=both;
FAL_CLIENT: FAL_CLIENT specifies the FAL(fetch archive log) client name that is used by the FAL service. It is configured for point the FAL Client. Value in FAL_CLIENT is also an Oracle Net Service Name. ALTER SYSTEM SET fal_server=’orcl ‘SCOPE=both; ALTER SYSTEM SET fal_client=’stand’SCOPE=both;
STANDBY_FILE_MANAGEMENT: STANDBY_FILE_MANAGEMENT enables or disables automatic standby file management. When automatic standby file management is enabled, operating system file additions and deletions on the primary database are replicated on the standby database. MANUAL:
Disables automatic standby file management. AUTO:
Enables automatic standby file management. SQL> ALTER SYSTEM SET standby_file_management=’AUTO’ SCOPE=both;
Thank you for giving your valuable time to read the above information.
If you want to be updated with all our articles send us the Invitation or Follow us:
Description: In this blog, we are going to see oracle Data Guard architecture and a clear description of the data guard overall process.
What is Oracle Data Guard:
Oracle Data Guard ensures high availability, data protection, and disaster recovery for enterprise data.
Data Guard maintains these standby databases as transactionally consistent copies of the production database.
If the production database becomes unavailable, Data Guard can switch any standby database to the production role.
Data Guard configuration pre-system checks: Hardware : Hardware can be different for the standby and primary databases. Like CPU, hard disk capacity. Operating system : The operating system should be the same as both the primary and standby databases, if you use Linux on the primary side the same os will be the standby. OS versions can be different but the platform should be the same. Software : The same release of oracle database version in primary and standby side. Standby database enables archive and force logging method. Sysdba privilege required.
ORACLE DATA GUARD ARCHITECTURE: Primary Database Process:
LGWR(log writer) Log writer collects transaction log information and updates to the online redo logs. LGWR modes: SYNC– in synchronous mode, it sends redo information directly to the RFS(remote file server) process on the standby database its waits for the confirmation before proceeding. ASYNC – in asynchronous mode its also sends redo information directly it does not wait before proceeding. In ASYNC mode LGWR submits the network I/O request to the network server (LNSn) process for the destination.
Archiver process(ARCn): ARCn or a SQL session performing an archival operation, create a copy of online redo logs locally for primary database recovery. ARCn also send simultaneously online logs to the RFS(remote file server) It’s also responsible for GAP solving in the standby database.
FAL (Fetch Archive Logs): FAL provides a client/server mechanism for resolving gaps detected in the range of archive logs generated in the primary database and received to the standby database.
Standby Database Process:
RFS (remote file server process): RFS it receives redo information from the primary database. RFS writes redo to standby redo logs or archived logs Each primary LSN, ARCn has their own RFS
ARC archiver process; ARCn process archives all standby redo logs.
Managed Recovery Process(MRP): For the physical standby database, only MRP applies archived log information to the physical standby database. MRP process commands: Alter database recover managed standby database disconnect no delay. Alter database recover managed standby database disconnect from the session. Alter database recover managed standby database cancel.
Logical standby database: LSP is controlling the applies of archived redo log information to the logical standby database.
Standby redo log files: Standby redo log files are used only when the database is in the standby role to store redo data received from the primary database. Standby redo logs from a separate pool of log filegroup.


 BY USING REPLACE LOAD DATA PROCESS: