Backup Based Physical Standby Configuration

Backup Based Physical Standby Configuration Manually

Description:
         In this blog we are going to see step by step configuration and demo of oracle database primary to physical standby.

Backup Based Standby Configuration:
         Mostly we have configure standby database in active data guard method. using level 0 backup we configure physical standby database.

Overall Steps:

1. check the role in primary database.
2. Take level 0 backup using RMAN.
3. Primary database parameter configuration.
4. Control and Pfile creation for standby database.
5. Create directory in standby database.
6. Copy archivelogs,control file,pfile, backupsets to standby database.
7. Standby configuration.
8. Bounce database and set the standby control file.
9. Connect RMAN and restore ,recover the database.
10. Check the database can be created.
11. Start the MRP process.
12. Check the Log sync status.

Step 1:- Check the database role in primary database.
SQL> select name,open_mode,database_role from v$database;
Step 2:- Take level 0 backup using RMAN.
RMAN> backup incremental level 0 database plus archivelog;
Step 3:- Primary database parameter configuration.

SQL> ALTER SYSTEM SET log_archive_config=’dg_config=(cloud,local)’ SCOPE=both;

System altered.

SQL> ALTER SYSTEM SET log_archive_dest_1=’location=use_db_recovery_file_dest valid_for=(all_logfiles,all_roles) db_unique_name=cloud’ SCOPE=both;

System altered.

SQL> ALTER SYSTEM SET log_archive_dest_2=’service=local async valid_for=(online_logfiles,primary_role) db_unique_name=local’ SCOPE=both;

System altered.

SQL> ALTER SYSTEM SET fal_server=’local’ SCOPE=both;

System altered.

SQL> ALTER SYSTEM SET fal_client=’c’ SCOPE=both;

System altered.

SQL> ALTER SYSTEM SET standby_file_management=’AUTO’ SCOPE=both;

System altered.

Step 4:- Create control file and Pfile for standby database.

SQL> ALTER DATABASE CREATE STANDBY CONTROLFILE AS ‘/u01/app/oracle/oradata/CLOUD/standby.ctl’;

Database altered.

SQL> CREATE PFILE=’$ORACLE_HOME/dbs/initcompany.ora’ FROM SPFILE;

File created.

Step 5:- Create directory in standby database.
[oracle@standby ~]$ mkdir -p /u01/app/oracle/oradata/COMPANY/controlfile
[oracle@standby ~]$ mkdir -p /u01/app/oracle/fast_recovery_area/COMPANY/backupset/2021_12_17/
mkdir -p /u01/app/oracle/fast_recovery_area/COMPANY/archivelog/2021_12_17
[oracle@standby ~]$ mkdir -p /u01/app/oracle/admin/COMPANY/adump
/u01/app/oracle/fast_recovery_area/CLOUD/backupset/

Step 6:- Copy archivelogs,control file,pfile, backupsets to standby database.
Pfile and password file:
[oracle@primary dbs]$ scp orapwcloud [email protected]:$ORACLE_HOME/dbs
[email protected]'s password:
orapwcloud 100% 2048 2.1MB/s 00:00
[oracle@primary dbs]$ scp initcompany.ora [email protected]:$ORACLE_HOME/dbs
[email protected]'s password:
initcompany.ora 100% 1512 1.3MB/s 00:00
[oracle@primary dbs]$ cd
[oracle@primary ~]$ cd /u01/app/oracle/fast_recovery_area/
[oracle@primary fast_recovery_area]$ ls
Archivelogs:
/u01/app/oracle/fast_recovery_area/CLOUD/archivelog/2021_12_17
[oracle@primary 2021_12_17]$ ll
total 24288
-rw-rw----. 1 oracle oracle 22827008 Dec 17 07:38 o1_mf_1_2_jvqw80t4_.arc
-rw-rw----. 1 oracle oracle 2004480 Dec 17 07:39 o1_mf_1_3_jvqwcpbc_.arc
-rw-rw----. 1 oracle oracle 35840 Dec 17 07:41 o1_mf_1_4_jvqwglmx_.arc
[oracle@primary 2021_12_17]$ scp o1_mf_1_2_jvqw80t4_.arc [email protected]:/u01/app/oracle/fast_recovery_area/COMPANY/archivelog/2021_12_17
[email protected]'s password:
o1_mf_1_2_jvqw80t4_.arc 100% 22MB 42.4MB/s 00:00
[oracle@primary 2021_12_17]$ scp o1_mf_1_3_jvqwcpbc_.arc [email protected]:/u01/app/oracle/fast_recovery_area/COMPANY/archivelog/2021_12_17
[email protected]'s password:
Permission denied, please try again.
[email protected]'s password:
o1_mf_1_3_jvqwcpbc_.arc 100% 1958KB 63.2MB/s 00:00
[oracle@primary 2021_12_17]$ scp o1_mf_1_4_jvqwglmx_.arc [email protected]:/u01/app/oracle/fast_recovery_area/COMPANY/archivelog/2021_12_17
[email protected]'s password:
o1_mf_1_4_jvqwglmx_.arc 100% 35KB 20.1MB/s 00:00
[oracle@primary 2021_12_17]$ cd ..
[oracle@primary archivelog]$ cd ..
Backup sets:
[oracle@primary backupset]$ cd 2021_12_17
[oracle@primary 2021_12_17]$ ll
total 2049948
-rw-rw----. 1 oracle oracle 519864832 Dec 17 07:40 o1_mf_annnn_TAG20211217T073959_jvqwcqrw_.bkp
-rw-rw----. 1 oracle oracle 196301312 Dec 17 07:40 o1_mf_annnn_TAG20211217T073959_jvqwdkp0_.bkp
-rw-rw----. 1 oracle oracle 24836608 Dec 17 07:40 o1_mf_annnn_TAG20211217T073959_jvqwds4r_.bkp
-rw-rw----. 1 oracle oracle 38912 Dec 17 07:41 o1_mf_annnn_TAG20211217T074130_jvqwgls4_.bkp
-rw-rw----. 1 oracle oracle 1358094336 Dec 17 07:41 o1_mf_nnnd0_TAG20211217T074035_jvqwdvrz_.bkp
[oracle@primary 2021_12_17]$ scp o1_mf_annnn_TAG20211217T073959_jvqwcqrw_.bkp [email protected]:/u01/app/oracle/fast_recovery_area/COMPANY/backupset/2021_12_17/
[email protected]'s password: 
o1_mf_annnn_TAG20211217T073959_jvqwcqrw_.bkp 100% 496MB 30.3MB/s 00:16 
[oracle@primary 2021_12_17]$ scp o1_mf_annnn_TAG20211217T073959_jvqwdkp0_.bkp [email protected]:/u01/app/oracle/fast_recovery_area/COMPANY/backupset/2021_12_17/
[email protected]'s password: 
o1_mf_annnn_TAG20211217T073959_jvqwdkp0_.bkp 100% 187MB 37.4MB/s 00:05 
[oracle@primary 2021_12_17]$ scp o1_mf_annnn_TAG20211217T073959_jvqwds4r_.bkp [email protected]:/u01/app/oracle/fast_recovery_area/COMPANY/backupset/2021_12_17/
[email protected]'s password: 
o1_mf_annnn_TAG20211217T073959_jvqwds4r_.bkp 100% 24MB 42.7MB/s 00:00 
[oracle@primary 2021_12_17]$ scp o1_mf_annnn_TAG20211217T074130_jvqwgls4_.bkp [email protected]:/u01/app/oracle/fast_recovery_area/COMPANY/backupset/2021_12_17/
[email protected]'s password: 
o1_mf_annnn_TAG20211217T074130_jvqwgls4_.bkp 100% 38KB 2.3MB/s 00:00 
[oracle@primary 2021_12_17]$ scp o1_mf_nnnd0_TAG20211217T074035_jvqwdvrz_.bkp [email protected]:/u01/app/oracle/fast_recovery_area/COMPANY/backupset/2021_12_17/
[email protected]'s password: 
o1_mf_nnnd0_TAG20211217T074035_jvqwdvrz_.bkp 100% 1295MB 37.2MB/s 00:34 
[oracle@primary 2021_12_17]$ cd ../..
[oracle@primary CLOUD]$ ls

Step 7:- Standby Configuration.

1. Pfile parameter changes:
*.audit_file_dest='/u01/app/oracle/admin/cloud/adump'
*.audit_trail='db'
*.compatible='19.0.0'
*.control_files='/u01/app/oracle/oradata/CLOUD/controlfile/o1_mf_jvbn3nsp_.ctl','/u01/app/oracle/fast_recovery_area/CLOUD/controlfile/o1_mf_jvbn3nxt_.ctl'
*.db_block_size=8192
*.db_create_file_dest='/u01/app/oracle/oradata'
*.db_name='cloud'
*.db_unique_name='company'
*.db_recovery_file_dest='/u01/app/oracle/fast_recovery_area'
*.db_recovery_file_dest_size=8256m
*.diagnostic_dest='/u01/app/oracle'
*.dispatchers='(PROTOCOL=TCP) (SERVICE=cloudXDB)'
*.fal_client='company'
*.fal_server='cloud'
*.log_archive_config='dg_config=(cloud,company)'
*.log_archive_dest_1='location=use_db_recovery_file_dest valid_for=(all_logfiles,all_roles) db_unique_name=cloud'
*.log_archive_dest_2='service=company async valid_for=(online_logfiles,primary_role) db_unique_name=cloud'
*.log_archive_dest_state_2='ENABLE'
*.open_cursors=300
*.pga_aggregate_target=379m
*.processes=300
*.remote_login_passwordfile='EXCLUSIVE'
*.sga_target=1136m
*.standby_file_management='AUTO'
*.undo_tablespace='UNDOTBS1'

2. Start the Database using spfile:

[oracle@local dbs]$ export ORACLE_SID=company
[oracle@local dbs]$ sqlplus / as sysdba

SQL*Plus: Release 19.0.0.0.0 – Production on Fri Dec 17 08:17:06 2021
Version 19.3.0.0.0

Copyright (c) 1982, 2019, Oracle. All rights reserved.

Connected to an idle instance.

SQL> CREATE SPFILE FROM PFILE=’initcompany.ora’;

File created.

Step 8:- Bounce database and set the standby control file.

SQL> startup mount;
ORACLE instance started.

Total System Global Area 1191181696 bytes
Fixed Size 8895872 bytes
Variable Size 318767104 bytes
Database Buffers 855638016 bytes
Redo Buffers 7880704 bytes
Database mounted.
SQL> exit

SQL> alter system set control_files=’/u01/app/oracle/oradata/COMPANY/standby.ctl’ scope=spfile;

System altered.

Step 9:-Connect RMAN and restore ,recover the database.

RMAN> restore database;

Starting restore at 17-DEC-21
Starting implicit crosscheck backup at 17-DEC-21
using target database control file instead of recovery catalog
allocated channel: ORA_DISK_1
channel ORA_DISK_1: SID=46 device type=DISK
Crosschecked 18 objects
Finished implicit crosscheck backup at 17-DEC-21

Starting implicit crosscheck copy at 17-DEC-21
using channel ORA_DISK_1
Finished implicit crosscheck copy at 17-DEC-21

searching for all files in the recovery area
cataloging files...
cataloging done

List of Cataloged Files
=======================
File Name: /u01/app/oracle/fast_recovery_area/COMPANY/backupset/2021_12_17/o1_mf_annnn_TAG20211217T073959_jvqwcqrw_.bkp
File Name: /u01/app/oracle/fast_recovery_area/COMPANY/backupset/2021_12_17/o1_mf_annnn_TAG20211217T073959_jvqwdkp0_.bkp
File Name: /u01/app/oracle/fast_recovery_area/COMPANY/backupset/2021_12_17/o1_mf_annnn_TAG20211217T073959_jvqwds4r_.bkp
File Name: /u01/app/oracle/fast_recovery_area/COMPANY/backupset/2021_12_17/o1_mf_annnn_TAG20211217T074130_jvqwgls4_.bkp
File Name: /u01/app/oracle/fast_recovery_area/COMPANY/backupset/2021_12_17/o1_mf_nnnd0_TAG20211217T074035_jvqwdvrz_.bkp
File Name: /u01/app/oracle/fast_recovery_area/COMPANY/archivelog/2021_12_17/o1_mf_1_2_jvqw80t4_.arc
File Name: /u01/app/oracle/fast_recovery_area/COMPANY/archivelog/2021_12_17/o1_mf_1_3_jvqwcpbc_.arc
File Name: /u01/app/oracle/fast_recovery_area/COMPANY/archivelog/2021_12_17/o1_mf_1_4_jvqwglmx_.arc

using channel ORA_DISK_1

channel ORA_DISK_1: starting datafile backup set restore
channel ORA_DISK_1: specifying datafile(s) to restore from backup set
channel ORA_DISK_1: restoring datafile 00001 to /u01/app/oracle/oradata/CLOUD/datafile/o1_mf_system_jvbmzxk8_.dbf
channel ORA_DISK_1: restoring datafile 00003 to /u01/app/oracle/oradata/CLOUD/datafile/o1_mf_sysaux_jvbn1c3g_.dbf
channel ORA_DISK_1: restoring datafile 00004 to /u01/app/oracle/oradata/CLOUD/datafile/o1_mf_undotbs1_jvbn24dz_.dbf
channel ORA_DISK_1: restoring datafile 00007 to /u01/app/oracle/oradata/CLOUD/datafile/o1_mf_users_jvbn25hj_.dbf
channel ORA_DISK_1: reading from backup piece /u01/app/oracle/fast_recovery_area/COMPANY/backupset/2021_12_17/o1_mf_nnnd0_TAG20211217T074035_jvqwdvrz_.bkp
channel ORA_DISK_1: piece handle=/u01/app/oracle/fast_recovery_area/COMPANY/backupset/2021_12_17/o1_mf_nnnd0_TAG20211217T074035_jvqwdvrz_.bkp tag=TAG20211217T074035
channel ORA_DISK_1: restored backup piece 1
channel ORA_DISK_1: restore complete, elapsed time: 00:00:45
Finished restore at 17-DEC-21

RMAN> recover database;

Starting recover at 17-DEC-21
using channel ORA_DISK_1

starting media recovery

archived log for thread 1 with sequence 4 is already on disk as file /u01/app/oracle/fast_recovery_area/COMPANY/archivelog/2021_12_17/o1_mf_1_4_jvqwglmx_.arc
archived log file name=/u01/app/oracle/fast_recovery_area/COMPANY/archivelog/2021_12_17/o1_mf_1_4_jvqwglmx_.arc thread=1 sequence=4
media recovery complete, elapsed time: 00:00:00
Finished recover at 17-DEC-21

RMAN> exit

Step 10:- Check the database can be created.

SQL> select name,open_mode from v$database;

NAME OPEN_MODE
——— ——————–
CLOUD MOUNTED

SQL> select name,open_mode,database_role from v$database;

NAME OPEN_MODE DATABASE_ROLE
——— ——————– —————-
CLOUD MOUNTED PHYSICAL STANDBY

Step 11:- Start the MRP process.

SQL> alter database recover managed standby database disconnect nodelay;

Database altered.

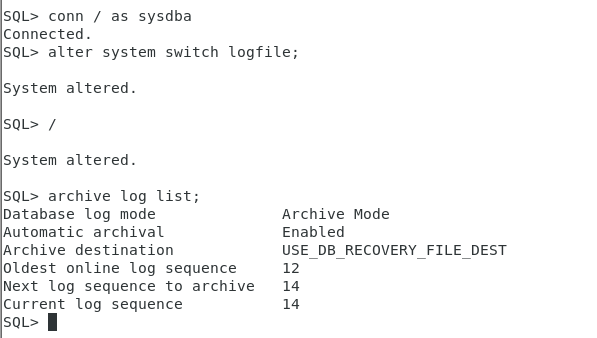
Step 12:- Log sync status.

switch logs in primary, defer and enable the dest.

SQL> alter system set log_archive_dest_state_2=defer;

System altered.

SQL> alter system set log_archive_dest_state_2=enable;

System altered.

SQL> alter system switch logfile;

System altered.

SQL> alter system switch logfile;

System altered.

SQL> /

System altered.

SQL> archive log list
Database log mode Archive Mode
Automatic archival Enabled
Archive destination USE_DB_RECOVERY_FILE_DEST
Oldest online log sequence 8
Next log sequence to archive 10
Current log sequence 10
SQL>

check the status in standby.

SQL> alter database recover managed standby database disconnect nodelay;

Database altered.

SQL> SELECT ARCH.THREAD# “Thread”, ARCH.SEQUENCE# “Last Sequence Received”, APPL.SEQUENCE# “Last Sequence Applied”, (ARCH.SEQUENCE# – APPL.SEQUENCE#) “Difference”
FROM(SELECT THREAD# ,SEQUENCE# FROM V$ARCHIVED_LOG WHERE (THREAD#,FIRST_TIME ) IN (SELECT THREAD#,MAX(FIRST_TIME) FROM V$ARCHIVED_LOG GROUP BY THREAD#)) ARCH,
(SELECT THREAD# ,SEQUENCE# FROM V$LOG_HISTORY WHERE (THREAD#,FIRST_TIME ) IN (SELECT THREAD#,MAX(FIRST_TIME) FROM V$LOG_HISTORY GROUP BY THREAD#)) APPL
WHERE ARCH.THREAD# = APPL.THREAD# ORDER BY 1; 2 3 4

Thread Last Sequence Received Last Sequence Applied Difference
———- ———————- ——————— ———-
1                              9                                    9                       0

SQL>


Thank you for giving your valuable time to read the above information.

If you want to be updated with all our articles send us the Invitation or Follow us:

Ramkumar’s LinkedIn: https://www.linkedin.com/in/ramkumardba/
LinkedIn Group: https://www.linkedin.com/in/ramkumar-m-0061a0204/
Facebook Page: https://www.facebook.com/Oracleagent-344577549964301
Ramkumar’s Twitter: https://twitter.com/ramkuma02877110
Ramkumar’s Telegram: https://t.me/oracleageant
Ramkumar’s Facebook: https://www.facebook.com/ramkumarram8

ASM Configuration for Standalone Database

Oracle ASM standalone configuration

Description:
In this blog, we are going to see the step-by-step configuration for standalone ASM using the oracle restart method.

Standalone Database:
The Oracle Grid Infrastructure for a standalone server is the Oracle software that provides system support for an Oracle database including volume management, file system, and automatic restart capabilities.

ASM server:
          Automatic Storage Management (ASM) is an integrated, high-performance database file system and disk manager. ASM is based on the principle that the database should manage storage instead of requiring an administrator to do it.

High Level Steps

Adding disk group in Virtual Machine
Grid software Installation
Oracle software installation
ASM standalone DB using the DBCA tool.

Adding Disk Group in Virtual Machine:

Step 1: open virtual machine hardware menu clicks add button:

Step 2:- Select an independent option and click next:

Step 3:- select create a new virtual disk and click next:

Step 4:- select allocate all disk space now option:

Step 5:- Select the folder and create the Disk:

ASM Hard Disk added:

Step 6:- OS-level disk partition :
Power on the virtual machine and check fdisk -l
Partition the disks:
fdisk/dev/sdb
Configure ASMLib using the following command.
oracleasm configure -i
create disk in OS level
/usr/sbin/oracleasm init
/usr/sbin/oracleasm createdisk DISK1 /dev/sdb1

GRID installation pre requests:

Check pre-install
Yum search preinstall

yum install oracle-database-preinstall-19c.x86_64 -y

yum install kmod-oracleasm.x86_64

yum install oracleasm-support.x86_64

Create a grid home directory and unzip the grid home

Add asm groups
[root@asm ~]# groupadd -g 54327 asmdba
[root@asm ~]# groupadd -g 54328 asmoper
[root@asm ~]# groupadd -g 54329 asmadmin
usermod -g oinstall -G dba,oper,backupdba,dgdba,kmdba,asmdba,asmoper,asmadmin,racdba oracle

Install the package cvudisk :
rpm -ivh /u01/app/grid/cv/rpm/cvuqdisk-1.0.10-1.rpm

Run the script:

Oracle Grid software installation:

Click the oracle restart method:

Give any disk group name and redundancy as external change the path as /dev/oracleasm/disks

Select the disk path

Set the password for ASM
Click next to continue.
Click next to continue
check the installation path
check the inventory path

Give root password to run the script automatically:

Summary of grid installation:
Running the installation
completed

Oracle Software installation

Unzip the Oracle 19c software in-home location

Run the ./runInstaller

Step1:- select set up software only option

Step 2:- select single instance database installation

Choose enterprise edition:
specify the location

Summary of installation

oracle software installation completed

ASM Standalone Database creation using DBCA Tool:

Select create database:

Give sid name and create admin password also select container database and mention the db name
check the asm configuration

Summary of db creation
db creation in progress

DB creation complete

Check the ASM standalone database created :


Thank you for giving your valuable time to read the above information.

If you want to be updated with all our articles send us the Invitation or Follow us:

Ramkumar’s LinkedIn: https://www.linkedin.com/in/ramkumardba/
LinkedIn Group: https://www.linkedin.com/in/ramkumar-m-0061a0204/
Facebook Page: https://www.facebook.com/Oracleagent-344577549964301
Ramkumar’s Twitter: https://twitter.com/ramkuma02877110
Ramkumar’s Telegram: https://t.me/oracleageant
Ramkumar’s Facebook: https://www.facebook.com/ramkumarram8 

Proactive and Reactive Measure for CVE-2021-44228 Log4j 2 exploitation

CVE-2021-44228 vulnerability for oc4j on OEM server:

EM 13.5FMW Component on OMS HomeDB Plugin HomeFMW Component on Agent HomeSteps to perform on each component:Patch/Mitigate FMW component on OMS Home1. Stop the OMS and set the environment variablesexport ORACLE_HOME=<Middleware_Home>export PATH=$ORACLE_HOME/bin:$PATHexport PATH=$ORACLE_HOME/OMSPatcher:$PATH$ emctl stop oms -all2. Apply the patches in the below ordera. Apply OCT WLS PSU Patch 33416868 on OMS Middleware Home ( Mandatory)b. Apply Overlay Patch 33671996 on OMS Middleware Home ( To resolve Log4j2.X vulnerability)3. Restart OMS$ emctl start omsImportant Instructions:1. This Patch has to be applied on OMS HOME(ORACLE_HOME=$MIDDLEWARE_HOME)2. Upcoming JAN 2022 WLS PSU Patch contains the fix of Log4j2.x Vulnerability ( Patch not yet released)Patch/Mitigate Agent HomePatch details will be updated in this section once availableMitigation PlanNavigate to location$AGENT_HOME/oracle_common/modules/thirdparty/Run the below command$ zip -q -d log4j-2.11.1.jar org/apache/logging/log4j/core/lookup/JndiLookup.classVerify the removal of class on the LOG4J core jar$ unzip -l log4j-2.11.1.jar | grep JndiLookup.classRestart the Agent<agent_inst>/bin/emctl stop agent<agent_inst>/bin/emctl start agent

Note: These steps have to be performed on each agent home

Patch/Mitigate DB Plug-in Home1. Stop the OMS and set the environment variablesexport ORACLE_HOME=<Middleware_Home>export PATH=$ORACLE_HOME/bin:$PATHexport PATH=$ORACLE_HOME/OMSPatcher:$PATH$ emctl stop oms -all2. Apply Patch 33672721 on OMS Middleware HOME3. Navigate to the <PATCH_TOP_DIR>/33672721 directory:cd <PATCH_TOP_DIR>/omspatcher apply -bitonly4. Start OMS server$ emctl start omsImportant Instructions:1. This Patch 33672721 is applicable on the base version or any RU level (RU01 and RU02) of the OEM 13.5 version.2. 13.5 Patch needs to be applied in bit-only mode. If applied in normal mode starting of omspatcher will fail as job_queue_processes would have been set to 0. To fix it, job_queue_processes needs to be set to an earlier value and then start oms3. Patch can be applied in a rolling manner. No need for complete downtime. In the case of multi-oms env, a patch needs to be applied on every OMS (stop OMS, apply the patch using omspatcher apply -bit only, start OMS).4. omspatcher needs to be of version 13.9.5.0.0 or later. Customers on 13.5 RU01 or RU02 by default will have version 13.9.5.0.0 or higher5. For Customer on 13.5 base release (without any RU), omspatcher needs to be upgraded to the latest available (13.9.5.1.0 – which was released with RU02) before applying one-off the patch6. If the Customer is on a 13.5 base release or 13.5 RU01, apply this one-off patch to fix the vulnerability, and if the customer applies RU02 in the future, the vulnerability will get introduced again. In such a case, the existing one-off patch needs to be rolled back in bit-only mode, again applying the same patch in bit-only mode to resolve the issue.


Thank you for giving your valuable time to read the above information.

If you want to be updated with all our articles send us the Invitation or Follow us:

Ramkumar’s LinkedIn: https://www.linkedin.com/in/ramkumardba/
LinkedIn Group: https://www.linkedin.com/in/ramkumar-m-0061a0204/
Facebook Page: https://www.facebook.com/Oracleagent-344577549964301
Ramkumar’s Twitter: https://twitter.com/ramkuma02877110
Ramkumar’s Telegram: https://t.me/oracleageant
Ramkumar’s Facebook: https://www.facebook.com/ramkumarram8

Oracle Database Restore Point

ORACLE DATABASE RESTORE POINT

Description :           In this blog, we are going to see the Oracle database restore point and its types with the demo.Normal Restore Point:
  • A normal restore point enables you to flash the database back to a restore point within the time determined by DB_FLASHBACK_RETENTION_TARGET initialization parameter setting.
  • A normal restore point can be dropped explicitly.
  • The control files stores name of the restore point and the SCN.
Guaranteed restore point:
  • A guaranteed restore point enables you to flash the database back to the restore point regardless of DB_FLASHBACK_RETENTION_TARGET initialization parameter setting.
  • Guaranteed restore point must be dropped explicitly by the user using the DROP RESTORE POINT command.
  • Guaranteed restore point never ages out.
Normal Restore Point Demo:Must DB in archive log mode.SQL> archive log list; Database log mode              Archive Mode Automatic archival               EnabledCheck available restore point: SQL>  select name from v$restore_point; no rows selectedCreate a normal restore point: SQL> create restore point res_test; Restore point created.View the created restore point: SQL> select name from v$restore_point; NAME ——————– RES_TESTAfter the creation of the restore point creates a table. SQL> create table test as select * from dba_users; Table created.Check the RVWR process status.          In normal restore point no background process are started.  [oracle@primary ~]$ ps -ef |grep -i rvwr oracle   16948 14963  0 09:40 pts/2    00:00:00 grep –color=auto -i rvwrFlashback the restore point: SQL> flashback database to restore point res_test; Flashback complete.Guaranteed Restore Point Demo:Create guarantee restore point: SQL> create restore point res_test1 guarantee flashback database; Restore point created.RVWR back ground process can be started automatically. [oracle@primary ~]$  ps -ef |grep -i rvwr oracle   17014     1  0 09:41 ?        00:00:00 ora_rvwr_orcl oracle   17060 14963  0 09:42 pts/2    00:00:00 grep –color=auto -i rvwr [oracle@primary ~]$Check the flashback status: SQL> select flashback_on from v$database; FLASHBACK_ON —————— RESTORE POINT ONLYAutomatically create flashback logs: [oracle@primary ORCL]$ cd flashback/ [oracle@primary flashback]$ ls o1_mf_jtotn2c3_.flb  o1_mf_jtotn8d4_.flbDrop restore point the logs will be removed. SQL> drop restore point res_test1; Restore point dropped. [oracle@primary ~]$ cd /u01/app/oracle/fast_recovery_area/ORCL/flashback [oracle@primary flashback]$ ls [oracle@primary flashback]$Bounce database and Flashback database to restore point: SQL> flashback database to restore point res_test2; Flashback complete.Reset the logs: SQL> alter database open resetlogs; Database altered.SQL>  select count(*) from test1;   COUNT(*)     ———-         45 Thank you for giving your valuable time to read the above information.If you want to be updated with all our articles send us the Invitation or Follow us:Ramkumar’s LinkedIn: https://www.linkedin.com/in/ramkumardba/ LinkedIn Group: https://www.linkedin.com/in/ramkumar-m-0061a0204/ Facebook Page: https://www.facebook.com/Oracleagent-344577549964301 Ramkumar’s Twitter: https://twitter.com/ramkuma02877110 Ramkumar’s Telegram: https://t.me/oracleageant Ramkumar’s Facebook: https://www.facebook.com/ramkumarram8

Oracle Wait Events And Their Solutions

Oracle Wait Events And Their Solutions.

Buffer Busy Wait:

This wait event happens when a session tries to access a block in the buffer cache but it can't because the buffer is busy, that is another session is modifying the block and the contents of the block are in flux.

Buffer Busy Wait:

SQL> SELECT s.sql_hash_value, sw.p1 file#, sw.p2 block#, sw.p3 reason
FROM v$session_wait sw, v$session s
WHERE sw.event = 'buffer busy waits'
AND sw.sid = s.sid; 

no rows selected
SQL> SELECT  owner , segment_name , segment_type
FROM  dba_extents
WHERE  file_id = &FileNumber
AND  &BlockNumber BETWEEN block_id AND block_id + blocks -1;  2    3    4
Enter value for filenumber: 1
old   3: WHERE  file_id = &FileNumber
new   3: WHERE  file_id = 1
Enter value for blocknumber: 2
old   4: AND  &BlockNumber BETWEEN block_id AND block_id + blocks -1
new   4: AND  2 BETWEEN block_id AND block_id + blocks -1

no rows selected

Another query that can be very useful is finding the objects in the entire Oracle database that are suffering from "buffer busy waits". The following query gives the top 10 segments:
SQL> SELECT * FROM (
   SELECT owner, object_name, subobject_name, object_type,
          tablespace_name, value
   FROM v$segment_statistics
   WHERE statistic_name='buffer busy waits' and owner not like '%SYS%'
   ORDER BY value DESC)
WHERE ROWNUM <=10;

OWNER                OBJECT_NAME                    SUBOBJECT_NAME                 OBJECT_TYPE        TABLESPACE_NAME                  VALUE
-------------------- ------------------------------ ------------------------------ ------------------ ------------------------------ ----------
GSMADMIN_INTERNAL    DDLID$                                                        TABLE              SYSAUX                               0
XDB                  XDB$ROOT_INFO                                                 TABLE              SYSAUX                               0
XDB                  XDB$SCHEMA_URL                                                INDEX              SYSAUX                               0

DB File Sequential Read

The db file sequential read wait event has three parameters:
file#, first block#, and block count.
In Oracle Database 11g, this wait event falls under the User I/O wait class. 


The Oracle process wants a block that is currently not in the SGA, and it is waiting for the database block to be read into the SGA from disk.

The two important numbers to look for are the TIME_WAITED and AVERAGE_WAIT by individual sessions.

Significant db file sequential read wait time is most likely an application issue.


This event occurs when a user tries to perform a Physical I/O while waiting for sequential reads from the Buffer cache. This type of situation usually occurs when the data on the table is accessed by using index, not full table scan, as a result of single block reading.
If this event occurs,  possible reasons are wrong index usage, index fragmentation, excessive I/O traffic on specific disks. To Solve this problem, Query should use Right index and fragmented indexes should be defragmented with Rebuild Index operation.
When you encounter this wait event, which appears very frequently in AWR and ADDM reports, we cannot always say that there is a problem. However, if this wait event takes place, if the database have ‘Enqueue’ and Latch Free and they are spending too much time, then database should be monitored.

 DB File Scattered Read

This wait event occurs getting multiblock of physical blocks that are not physically close to each other (neighbors) into buffer cache Scattered, or during a full scan to the buffer cache. So Db file scattered read is to read multiple blocks I/O during the fast full scan.

A scattered read is usually a multiblock read. It can occur for a fast full scan (of an index) in addition to a full table scan. The db file scattered read wait event identifies that a full scan is occurring. When performing a full scan into the buffer cache, the blocks read are read into memory locations that are not physically adjacent to each other.

Multiblock (up to DB_FILE_MULTIBLOCK_READ_COUNT blocks) reads due to full scans into the buffer cache show up as waits for 'db file scattered read'.

Direct path Read

 This event occurs when Oracle Instance query data from the Datafiles asynchronously and puts this data into PGA  instead of Buffer Cache in SGA.
This type of event usually occurs during the use of Temporary ( Temp ) Tablespace in the Sorting operations, during the creation of Lob segments, and when multiple sessions Full table scan in parallel.
In order to solve this problem, the memory should be increased, parallel operations should not be done unless required, and pay attention to Lob segments reads.

 DB CPU

This event represents the total time spent of the users’ queries on the CPU.  Oracle’s Background processes (SMON, PMON ..) are not included in this total time.
If this value is high, it means that the Oracle instance spends most of the time on the CPU. To reduce this wait event, the SQLs in the SQL ordered by CPU section in the AWR report must be TUNE.

Logfile sync

 This event is known as the time lost as a result of the LGWR process waiting while users initiate a Transaction Commit or Rollback.
If this wait event is available continuously, I/O performance of the LGWR process is probably poor, or Commit is coming too often by the application. The solution to this problem is not to commit too much, if necessary, and to examine the I/O performance of the disk on which the Redo log files are located, and to use a high performance disk such as an SSD disk if necessary.

Enq: TX – row lock contention

 row lock contention:  This type of event occurs when a user session is trying to update or delete a row held by another session, which is an application design problem. Normally, when a transaction is finished, commit or rollback must be executed to release related rows.
The solution to this problem is that if the session that holds the row is active, then execute commit statement, if it is not active, kill the session or execute rollback the session.

ARCH wait on SENDREQ

This wait event is the total time taken by the Archiver Processes to archive the Standby in the Dataguard and to write these archives to the local disks.
The main reason why this value is high is that the archives sent to the Standby side arrive late due to the network. To solve this problem, it is necessary to optimize the Network and set the DEFAULT_SDU_SIZE parameter in the sqlnet.ora file to an optimized value (32767).

 Gc current block busy

 This wait event occurs between the nodes of the Cluster database ( Real Application Cluster ). When a transaction requests a block, that request sent to the master instance. Normally, this request is performed by a cache fusion.
However, in some cases, this block transfer is delayed because the corresponding instance is held by the other instance or because the corresponding transaction records cannot be written to the redo logs immediately, in which case this wait event is triggered.
This can be solved by tune the wait event Log Writer process or Solving network problem between Cluster nodes.

 Gc cr block busy-wait

ifference is that while the above event is running in current mode, this wait event runs in CR mode. This can be solved by tune the wait event Log Writer process.

Read by Other Session

When a session waits on the "read by other session" event, it indicates a wait for another session to read the data from disk into the Oracle buffer cache. If this happens too often the performance of the query or the entire database can suffer. Typically this is caused by contention for "hot" blocks or objects so it is imperative to find out which data is being contended for. Once that is known, there are several alternative methods for solving the issue.
When information is requested from the database, Oracle will first read the data from disk into the database buffer cache. If two or more sessions request the same information, the first session will read the data into the buffer cache while other sessions wait. In previous versions this wait was classified under the "buffer busy waits" event. However, in Oracle 10.1 and higher this wait time is now broken out into the "read by other session" wait event. Excessive waits for this event are typically due to several processes repeatedly reading the same blocks, e.g. many sessions scanning the same index or performing full table scans on the same table. Tuning this issue is a matter of finding and eliminating this contention.

Finding the contentions :
When a session is waiting on the "read by other session" event, an entry will be seen in the v$session_wait system view, which will give more information on the blocks being waited for: SELECT p1 "file#", p2 "block#", p3 "class#" FROM v$session_wait WHERE event = 'read by other session'; If information collected from the above query repeatedly shows that the same block (or range of blocks) is experiencing waits, this indicates a "hot" block or object. The following query will give the name and type of the object: SELECT relative_fno, owner, segment_name, segment_type FROM dba_extents WHERE file_id = &file AND &block BETWEEN block_id AND block_id + blocks - 1;
Eliminating contentions: Depending on the Oracle database environment and specific performance situation the following variety of methods can be used to eliminate contention: Tune inefficient queries - This is one of those events you need to "catch in the act" through the v$session_wait view as prescribed above. Then, since this is a disk operating system issue, take the associated system process identifier (c.spid) and see what information you can obtain from the operating system. Redistribute data from the hot blocks - Deleting and reinserting the hot rows will often move them to a new data block. This will help decrease contention for the hot block and increase performance. More information about the data residing within the hot blocks can be retrieved with queries similar to the following: SELECT data_object_id FROM dba_objects WHERE owner='&owner' AND object_name='&object'; SELECT dbms_rowid.rowid_create(1,<data_object_id>,<relative_fno>,<block>,0) start_rowid FROM dual; --rowid for the first row in the block SELECT dbms_rowid.rowid_create(1,<data_object_id>,<relative_fno>,<block>,500) end_rowid FROM dual; --rowid for the 500th row in the block SELECT <column_list> FROM <owner>.<segment_name> WHERE rowid BETWEEN <start_rowid> AND <end_rowid>

Thank you for giving your valuable time to read the above information.

If you want to be updated with all our articles send us the Invitation or Follow us:

Ramkumar’s LinkedIn: https://www.linkedin.com/in/ramkumardba/
LinkedIn Group: https://www.linkedin.com/in/ramkumar-m-0061a0204/
Facebook Page: https://www.facebook.com/Oracleagent-344577549964301
Ramkumar’s Twitter: https://twitter.com/ramkuma02877110
Ramkumar’s Telegram: https://t.me/oracleageant
Ramkumar’s Facebook: https://www.facebook.com/ramkumarram8

Standby Out Off Sync

Standby Out Off syncDescription:
In this blog, we are going to see standby log out off sync how to check and sync the primary and standby logs.

Standby Log Sync:
        The primary database logs are synced with the standby database in case any issue delay happens in log sync we restart the MRP process and defer enable the log_dest_2 location in the primary database.

Overall Steps:-

1. Bring Down the standby database.
2. Create a user and do multiple log switches in the primary database.
3. Start the standby database, and check the log difference.
4. primary database defers and enables the dest 2.
5. Restart the MRP process in the standby database.
6. Check the log Sync status.

Step 1:- Bring down the standby database.

SQL> shut immediate
ORA-01109: database not openDatabase dismounted.
ORACLE instance shut down.
SQL> startup
ORACLE instance started.

Step 2:- Create user and do multiple log switches in the primary database.

Check current archive log status:
SQL> archive log list;
Database log mode Archive Mode
Automatic archival Enabled
Archive destination USE_DB_RECOVERY_FILE_DEST
Oldest online log sequence 9
Next log sequence to archive 11
Current log sequence 11

Create a user and insert the table.
SQL> create user agent identified by agent;
SQL> alter user agent default tablespace users quota unlimited on users;
SQL> grant connect, resource to agent;
SQL> conn agent/agent
Connected.
SQL> show user
USER is “AGENT”
SQL> create table agent1 as select * from user_tables;
SQL> conn / as sysdba
Connected.

Do multiple log switches.
SQL> alter system switch logfile;

System altered.

SQL> /

System altered.

Check the archive log status.
SQL> archive log list;
Database log mode Archive Mode
Automatic archival Enabled
Archive destination USE_DB_RECOVERY_FILE_DEST
Oldest online log sequence 12
Next log sequence to archive 14
Current log sequence 14
SQL>

Step 3:- Start the standby database, and check the log difference.

Startup standby database.
SQL> startup
ORACLE instance started.

Total System Global Area 1258290752 bytes
Fixed Size 8896064 bytes
Variable Size 738197504 bytes
Database Buffers 503316480 bytes
Redo Buffers 7880704 bytes
Database mounted.
Database opened.

Check the log sync different.
SQL> SELECT ARCH.THREAD# “Thread”, ARCH.SEQUENCE# “Last Sequence Received”, APPL.SEQUENCE# “Last Sequence Applied”, (ARCH.SEQUENCE# – APPL.SEQUENCE#) “Difference”
FROM(SELECT THREAD# ,SEQUENCE# FROM V$ARCHIVED_LOG WHERE (THREAD#,FIRST_TIME ) IN (SELECT THREAD#,MAX(FIRST_TIME) FROM V$ARCHIVED_LOG GROUP BY THREAD#)) ARCH,
(SELECT THREAD# ,SEQUENCE# FROM V$LOG_HISTORY WHERE (THREAD#,FIRST_TIME ) IN (SELECT THREAD#,MAX(FIRST_TIME) FROM V$LOG_HISTORY GROUP BY THREAD#)) APPL
WHERE ARCH.THREAD# = APPL.THREAD# ORDER BY 1;

Step 4:-Primary database defer and enable the dest 2.

SQL> alter system set log_archive_dest_state_2=defer;

System altered.

SQL> alter system set log_archive_dest_state_2=enable;

System altered.

Step 5:- Restart the MRP process in the standby database.

SQL> alter database recover managed standby database disconnect nodelay;

Database altered.

Step 6:- Check the log sync status.

SQL> SELECT ARCH.THREAD# “Thread”, ARCH.SEQUENCE# “Last Sequence Received”, APPL.SEQUENCE# “Last Sequence Applied”, (ARCH.SEQUENCE# – APPL.SEQUENCE#) “Difference”
FROM(SELECT THREAD# , SEQUENCE# FROM V$ARCHIVED_LOG WHERE (THREAD#, FIRST_TIME ) IN (SELECT THREAD#, MAX(FIRST_TIME) FROM V$ARCHIVED_LOG GROUP BY THREAD#)) ARCH,
(SELECT THREAD# , SEQUENCE# FROM V$LOG_HISTORY WHERE (THREAD#, FIRST_TIME ) IN (SELECT THREAD#, MAX(FIRST_TIME) FROM V$LOG_HISTORY GROUP BY THREAD#)) APPL
WHERE ARCH.THREAD# = APPL.THREAD# ORDER BY 1; 2 3 4

**********************************************************************************

Thank you for giving your valuable time to read the above information.

If you want to be updated with all our articles send us the Invitation or Follow us:

Ramkumar’s LinkedIn: https://www.linkedin.com/in/ramkumardba/
LinkedIn Group: https://www.linkedin.com/in/ramkumar-m-0061a0204/
Facebook Page: https://www.facebook.com/Oracleagent-344577549964301
Ramkumar’s Twitter: https://twitter.com/ramkuma02877110
Ramkumar’s Telegram: https://t.me/oracleageant
Ramkumar’s Facebook: https://www.facebook.com/ramkumarram8

Data Guard Manual Reinstate Using Flashback

Data Guard Manual Reinstate Using Flashback

Description:
          In this blog, we are going to see step by step manual data guard reinstate process using the flashback database method.

Data Guard Reinstate:
          After done failover to your Standby database so it becomes the new Primary. the old primary database can be reinstated as a standby database. this convert happens only in the database in flashback mode.

Overall Steps:

  1. Check the flashback enabled.
  2. Get the SCN number from the new primary database.
  3. Bounce the old primary database open in the mount stage.
  4. Flashback the database in SCN number of the new primary database.
  5. Convert the database to physical standby.
  6. Bounce the database and check the database role.

Step 1:- Check the flashback enabled after failover.
SELECT FLASHBACK_ON FROM V$DATABASE;

Step 2:- Get SCN number from the new primary database.
SQL> select to_char(standby_became_primary_scn) from v$database;

Step 3:- Bounce the Old primary database and open as mount stage.

SQL> shut immediate
SQL> startup nomount;
SQL> alter database mount;
Database altered.

Step 4:- Flashback the database in SCN number of the new primary database.

flashback database to scn 2370985;

flashback complete.

Step 5:- Convert the database to physical standby.

SQL> Alter Database Convert To Physical Standby;

Database altered.

Step 6:- Bounce the database and check the database role.

SQL> shut immediate

SQL> startup
ORACLE instance started.
Database mounted.
Database opened.
SQL> select name,open_mode,database_role from v$database;

NAME OPEN_MODE DATABASE_ROLE
——— ——————– —————-
SYSTEM READ ONLY PHYSICAL STANDBY

*******************************************************************************


Thank you for giving your valuable time to read the above information.

If you want to be updated with all our articles send us the Invitation or Follow us:

Ramkumar’s LinkedIn: https://www.linkedin.com/in/ramkumardba/
LinkedIn Group: https://www.linkedin.com/in/ramkumar-m-0061a0204/
Facebook Page: https://www.facebook.com/Oracleagent-344577549964301
Ramkumar’s Twitter: https://twitter.com/ramkuma02877110
Ramkumar’s Telegram: https://t.me/oracleageant
Ramkumar’s Facebook: https://www.facebook.com/ramkumarram8

Top 10 by Buffer Gets

Top 10 by Buffer Gets
=====================
set linesize 1000
set pagesize 1000
col sql for a70
set long 5000
col hash_value for 9999999999999999999999
SELECT * FROM
(SELECT substr(sql_text,1,40) sql,
buffer_gets, executions, buffer_gets/executions “Gets/Exec”,
hash_value,address
FROM GV$SQLAREA
WHERE buffer_gets > 10000
ORDER BY buffer_gets DESC)
WHERE rownum <=10
;
==================================================================================================
Top 10 by Physical Reads
========================
set linesize 100
set pagesize 100
SELECT * FROM
(SELECT substr(sql_text,1,40) sql,
disk_reads, executions, disk_reads/executions “Reads/Exec”,
hash_value,address
FROM V$SQLAREA
WHERE disk_reads > 1000
ORDER BY disk_reads DESC)
WHERE rownum <=10;
==================================================================================================
Top 10 by Executions
====================
set linesize 1000
set pagesize 1000
col sql for a70
SELECT * FROM
(SELECT substr(sql_text,1,40) sql,
executions, rows_processed, rows_processed/executions “Rows/Exec”,
hash_value,address
FROM GV$SQLAREA
WHERE executions > 100
ORDER BY executions DESC)
WHERE rownum <=10;
==================================================================================================
Top 10 by Parse Calls:
========================
set linesize 100
set pagesize 100
SELECT * FROM
(SELECT substr(sql_text,1,40) sql,
parse_calls, executions, hash_value,address
FROM V$SQLAREA
WHERE parse_calls > 1000
ORDER BY parse_calls DESC)
WHERE rownum <=10
;
=================================================================================================
Top 10 by Sharable Memory:
========================
set linesize 100
set pagesize 100
SELECT * FROM
(SELECT substr(sql_text,1,40) sql,
sharable_mem, executions, hash_value,address
FROM V$SQLAREA
WHERE sharable_mem > 1048576
ORDER BY sharable_mem DESC)
WHERE rownum <=10
;
==================================================================================================
Top 10 by Version Count:
========================
set linesize 100
set pagesize 100
SELECT * FROM
(SELECT substr(sql_text,1,40) sql,
version_count, executions, hash_value,address
FROM V$SQLAREA
WHERE version_count > 20
ORDER BY version_count DESC)
WHERE rownum <=10
;

Thank you for giving your valuable time to read the above information.

If you want to be updated with all our articles send us the Invitation or Follow us:

Ramkumar’s LinkedIn: https://www.linkedin.com/in/ramkumardba/
LinkedIn Group: https://www.linkedin.com/in/ramkumar-m-0061a0204/
Facebook Page: https://www.facebook.com/Oracleagent-344577549964301
Ramkumar’s Twitter: https://twitter.com/ramkuma02877110
Ramkumar’s Telegram: https://t.me/oracleageant
Ramkumar’s Facebook: https://www.facebook.com/ramkumarram8

BLOCKING SESSION

BLOCKING SESSION
==================
set pages 1000 lines 1000
col owner for a20
col object_name for a34
col osuser for a15
col machine for a25
col object_type for a10
col inst_id for a5
select c.owner,c.object_name,c.object_type,b.sid,b.serial#, b.status, b.osuser, b.machine,b.inst_id
from gv$locked_object a ,gv$session b,dba_objects c
where b.sid = a.session_id and a.object_id = c.object_id;select s.blocking_session,s.sid,s.serial#,s.seconds_in_wait from gv$session s
where blocking_session is not null;
select SID,SESS_SERIAL#,BLOCKER_SID,BLOCKER_SESS_SERIAL#,BLOCKER_INSTANCE_ID from gV$SESSION_BLOCKERS;

Thank you for giving your valuable time to read the above information.

If you want to be updated with all our articles send us the Invitation or Follow us:

Ramkumar’s LinkedIn: https://www.linkedin.com/in/ramkumardba/
LinkedIn Group: https://www.linkedin.com/in/ramkumar-m-0061a0204/
Facebook Page: https://www.facebook.com/Oracleagent-344577549964301
Ramkumar’s Twitter: https://twitter.com/ramkuma02877110
Ramkumar’s Telegram: https://t.me/oracleageant
Ramkumar’s Facebook: https://www.facebook.com/ramkumarram8

KILL THE BLOCKING SESSION

KILL THE BLOCKING SESSION
===========================set head off;
select ‘alter system kill session ”’||sid||’,’||serial#||”’ immediate;’
from gv$session where sid=’&Blocking_session_SID’;

set heading on;

set head off;
select ‘alter system kill session ”’||sid||’,’||serial#||’,@’||inst_id||”’ immediate;’
from gv$session where sid=’&SID_TO_BE_KILLED’;

set heading on;
set head off;
select ‘alter system kill session ”’||sid||’,’||serial#||’,@’||inst_id||”’ immediate;’
from gv$session where status=’INACTIVE’ and last_call_et/60 > 60;
set heading on;

Thank you for giving your valuable time to read the above information.

If you want to be updated with all our articles send us the Invitation or Follow us:

Ramkumar’s LinkedIn: https://www.linkedin.com/in/ramkumardba/
LinkedIn Group: https://www.linkedin.com/in/ramkumar-m-0061a0204/
Facebook Page: https://www.facebook.com/Oracleagent-344577549964301
Ramkumar’s Twitter: https://twitter.com/ramkuma02877110
Ramkumar’s Telegram: https://t.me/oracleageant
Ramkumar’s Facebook: https://www.facebook.com/ramkumarram8